
This has been one of my favorite background images for YEARS now… Does well on desktops, phones and tablets!

config, code, consume
This has been one of my favorite background images for YEARS now… Does well on desktops, phones and tablets!
Another new category of my posts on my own blog: consume/music
Music is quite important to me. Once every while I get introduced to a musician or album and I am just all over it. Remember putting a cd in your player and just hit “repeat” and “play”? You still can these days! And I regularly do!
Today my big friend NIKOS sent me a tip which kickstarted this series:

https://cocainejesus.bandcamp.com/album/skipyear
Big THANX to Nikos for this tip!
Okay, for a new project I want to try and move to MongoDB, I am really looking forward to a schema free database where I can simply just store my ‘documents’ and do with them what I want!
So let’s log into our server and get some stuff installed:
$ doas pkg_add mongodb
$ doas rcctl enable mongod
$ doas rcctl start mongod
$ mongo
MongoDB shell version: 3.2.22
connecting to: test
Welcome to the MongoDB shell.
For interactive help, type "help".
For more comprehensive documentation, see
	http://docs.mongodb.org/
Questions? Try the support group
	http://groups.google.com/group/mongodb-user
Server has startup warnings:
2020-03-20T23:01:00.737+0100 I CONTROL  [initandlisten]
2020-03-20T23:01:00.737+0100 I CONTROL  [initandlisten] ** NOTE: your operating system version does not support the method that MongoDB
2020-03-20T23:01:00.737+0100 I CONTROL  [initandlisten] **       uses to detect impending page faults.
2020-03-20T23:01:00.737+0100 I CONTROL  [initandlisten] **       This may result in slower performance for certain use cases
2020-03-20T23:01:00.737+0100 I CONTROL  [initandlisten]
2020-03-20T23:01:00.737+0100 I CONTROL  [initandlisten] ** WARNING: soft rlimits too low. Number of files is 128, should be at least 1000
2020-03-20T23:01:00.737+0100 I CONTROL  [initandlisten]
For what it’s worth Mongo is showing some startup warnings, I’m going to ignore these for now. Let’s first insert some data so we can test our db connection later when we are in PHP:
$ mongo testdb
> db.users.insert({ 'name': 'Remy Blom', 'email': 'r@aodw.nl' })
Thing is we have a working MongoDB, kinda cool, but I want to be able to talk to it from PHP (or do I? I might have to rethink that… PHP is waaaay old and stuff?)
First we have to prepare our OpenBSD to be able to run the manual installation. (I still think this should also be able to work in such a way that you could just use the pecl install method, but I kept running into the error mentioning AUTOCONF_VERSION was not set…)
In order to get phpize running I had to do:
$ doas pkg_add pear autoconf
$ cd /usr/local/bin
$ ln -s phpize-7.3 phpize
$ ln -s php-config-7.3 php-config
Furthermore I had to add to my ./profile:
export AUTOCONF_VERSION=2.69Then I had to re-login for the profile to take effect and then I could run:
$ git clone https://github.com/mongodb/mongo-php-driver.git
$ cd mongo-php-driver
$ git submodule update --init
$ phpize
$ ./configure
$ make all
$ sudo make install
Restart php-fpm and ready to go:
$ doas rcctl restart php73_fpmLet’s write a little program that returns that user we inserted in the beginning:
<?php

    $m = new MongoDB\Driver\Manager("mongodb://localhost:27017");
    $query = new MongoDB\Driver\Query([]);

    $results = $m->executeQuery("testdb.users", $query);
    echo $results;

    foreach ($results as $result) {
        print_r($result);
    }
Running this code will print:
stdClass Object
(
    [_id] => MongoDB\BSON\ObjectId Object
        (
            [oid] => 5e79c3a3c7f38ba9c7943ffd
        )

    [name] => Remy Blom
    [email] => r@aodw.nl
)
Please note that in the $results object you don’t see any of your results, that had me looking puzzled and scratching my head for a while….
Every once and a while you run into an article on the internet that’s just too good to just make a bookmark (or some similar technique that allows you to store the URL to that previous piece of useful information). I have been on the internet long enough to know that no matter how good an article might be, just wait long enough and it will be gone, some day… So I decided to store these kinds of articles right here, on my own website, in what I call the Article Archive.
At my work, one of the things I do is install certificates on webservers, no big deal, but I tend to want to understand what I’m doing, what certificates are doing, how TLS is making the connection to my bank secure. And I don’t settle for “by using cryptography”. Patrick Nohe wrote this wonderfully complete breakdown of what a cipher suite actually is and what new things TLSv1.3 is bringing us. Let’s dive in!
Original: https://www.thesslstore.com/blog/cipher-suites-algorithms-security-settings/
If you interact with SSL/TLS and HTTPS encryption long enough, you’re eventually going to come across the term “cipher suite.” And while that sounds like a fancy nickname for Alan Turing’s hotel room, cipher suites play a critical role in every HTTPS connection you make on the internet.
So, what are encryption ciphers? And what are cipher suites?

Ciphers are algorithms, more specifically they’re a set of steps for performing a cryptographic function – it can be encryption, decryption, hashing or digital signatures. Nowadays ciphers are dependent upon the advanced processing capabilities of computers. That hasn’t always been the case though. One of the first, well-known historical ciphers belonged to Caesar – the very first emperor of Rome and purveyor of fancy appetizer salads – who used it to communicate with his generals during military operations.
Over the years, ciphers have become more complex, but the logic behind them has stayed the same. Whether it was Caesar crossing the Rubicon, the infamous Enigma cipher of World War II or some of the algorithms of today—the idea has always been to encode or encipher a message in such a way that only the intended party can read it.
Today we’re going to discuss SSL/TLS Cipher Suites – groups of ciphers that help secure an HTTPS connection – then go over their various parts and finish by looking at what’s changed between TLS 1.2 and TLS 1.3.
Let’s hash it out.
As we just covered, a cipher is really just an algorithm, or a set of steps that are used to perform a specific mathematical function – be that encryption, hashing or digital signatures. Ciphers have always had a basis in math, even Caesar’s primitive shift cipher required counting forward a designated number of spaces in the alphabet to encrypt something.
I’m going to use Caesar’s cipher to explain some basic concepts that will be useful later when we get into modern cipher suites. The piece of data or information – it’s all digital now, though historically there’s typically been some kind of ink and paper/parchment involved. Anyway, that original unencrypted piece of data would be referred to as the plaintext, as it’s easily readable in its raw form. After the encryption process has been performed, it becomes a piece of ciphertext and should ideally be unreadable to anyone without the private key.

Encryption is performed by keys, but it’s important to square how keys and algorithms/ciphers fit together.
The algorithm or cipher used is just that, it’s a sequence of steps that must be used to encrypt the plaintext.
Depending on the cryptosytem, either the values within that algorithm, or the value the algorithm arrives at itself, are the keys.
We’ll clarify that point in a minute, just think of it this way: the algorithms are the general principles/rules used by a given cryptosystem, the keys are what actually performs the function.
Sometimes it’s best to illustrate with an example so let’s go back to Caesar’s cipher and illustrate. In Caesar’s cipher, the actual algorithm is:

Ok, now let’s take a closer look at each component.
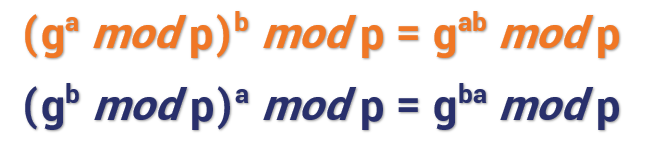
| Variable | Description |
| x | x represents the raw input, in this case x refers to whatever letter we’re shifting |
| e(x) | e(x) represents the encrypted value |
| k | k represents the key |
| mod | mod represents the modulus |
In Caesar’s cipher, the key is simply the number of spaces you decide to shift the letters. So, in the example below the key would be 3. We’re shifting everything three spaces forward.
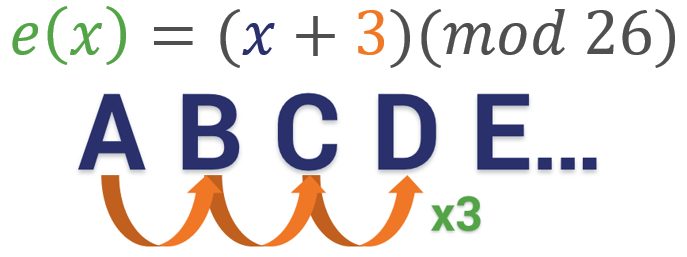
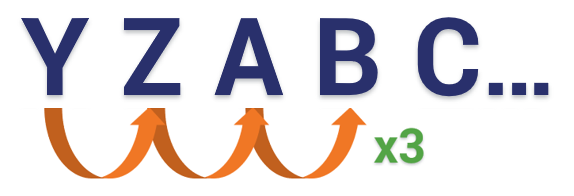
Now let’s add in the modulus. Modular arithmetic wraps around after it reaches the modulus, which is basically the end of the line, the number cap – however you want to think about it. With the alphabet, the modulus is obviously 26. There are 26 letters, so if you want to move a “Y” three spaces forward you have to wrap around and start back at 1 (or A) again. So in this instance, the equation would be B = (Y + 3)(mod 26).
It’s no different at the digital level. The math is far more complicated now – no human could do it efficiently – but the concept is still the same. It’s all just math. Now let’s apply what we learned about algorithms in general to SSL/TLS and HTTPS connections.

An HTTPS connection is actually a fairly complicated process. Last week we took a deep dive on the TLS handshake. This is the process where a client and server agree on a mutually support cipher suite and then use the chosen cipher suite to negotiate a secure connection.
Part of what makes the handshake so complicated is that it leverages several different cryptographic functions to achieve the HTTPS connection. During the handshake, the client and server will use:
These ciphers all work together at various points to perform authentication, key generation and exchange and a check-sum to ensure integrity.
In order to determine what specific algorithms to use, the client and server start by deciding on a cipher suite to use. Cipher suites are collections of these algorithms that can work together to perform the handshake and the encryption/decryption that follows. At the outset of the connection both parties share a list of supported cipher suites and then decide on the most secure, mutually supported suite.
The math is more complicated now… but the underlying concepts are still the same. It’s all just math.
There are 37 TLS 1.2 ciphers and five TLS 1.3 ciphers. Understanding their different parts is key to understanding HTTPS connections and SSL/TLS itself. Let’s start with an overview of TLS 1.2 – as it’s still the more common version of the protocol – and then we’ll talk about what’s improved in TLS 1.3.
As we covered in the last section, a Cipher Suite is a combination of algorithms used to negotiate security settings during the SSL/TLS handshake. When the ClientHello and ServerHello messages are exchanged the client sends a prioritized list of cipher suites it supports. The server then responds with the cipher suite it has selected from the list.
Cipher suites are named combinations of:
So, for instance, here’s an example of a cipher suite:

I’ve color-coated it to help you distinguish between the ciphers.
TLS is the protocol. Starting with ECDHE we can see that during the handshake the keys will be exchanged via ephemeral Elliptic Curve Diffie Hellman (ECDHE). RSA is the authentication algorithm. AES_128_GCM is the bulk encryption algorithm: AES running Galois Counter Mode with 128-bit key size. Finally, SHA-256 is the hashing algorithm.
By the end of this article all of that will make sense.
During the TLS 1.2 handshake it’s going to play out like this:
Obviously, that’s incredibly condensed, if you’re interested check out the full TLS Handshake article, but hopefully you can see where each cipher/algorithm comes into the picture.
Taking a Closer Look at the SSL/TLS Handshake
In Everything Encryption By Patrick Nohe
There’s a lot going on underneath the hood when you connect to a website via HTTPS. First and foremost, everyone needs to… shake hands?!
Unfortunately, TLS 1.2 has 37 different cipher suites to choose from and not all of them are still considered secure. You may be wondering how you wind up with nearly 40 different cipher suites. It’s two-fold. For one, TLS 1.2 has been around about 10 years, meaning there’s been plenty of times for new algorithms to arrive and old ones to phase out. And as that happens, the IANA, the Internet Assigned Numbers Authority, the organization that administers all of this, has to keep creating new combinations of ciphers – new cipher suites – owing to the fact that four different algorithms are required and there are myriad possible combinations.
Of course, not all of the algorithms play nice together, but enough do that there are 37 approved TLS 1.2 cipher suites in use today.
Let’s dive a little deeper into the four different components of the TLS 1.2 cipher suite. But first let’s talk a little bit about the two different kinds of encryption that you see in SSL/TLS.
One of the biggest points of confusion when it comes to SSL/TLS centers around the types of encryption that are used. That has to do with how SSL certificates are advertised. And this really shouldn’t come as too much of a surprise given the fact the industry has never taken the time to correct everyone on the fact that we’re now using TLS certificates.
The 2048-bit key associated with your SSL certificate is used to help negotiate the HTTPS connection, but its role is actually a lot narrower than most people are led to believe. And 2048-bit keys are far from the only option when it comes to public key cryptosystems. ECDSA uses much smaller keys to accomplish a similar function.
We just seem to be fixated on the 2048-bit private key because it sounds more impressive. And we can trot out the, “it would take over a quadrillion years for a modern computer to crack this key and we’ll all already be dead by then!”
But, arguably, the bulk cipher and the symmetric key you end up using DURING the connection are equally, if not more important than the public/private key pair.
Symmetric encryption involves two keys that are the same, or as the name quite cleverly implies, are symmetric. Both keys can perform both functions: encryption and decryption. This is the type of encryption that you’re actually using to communicate with the site you’re visiting.
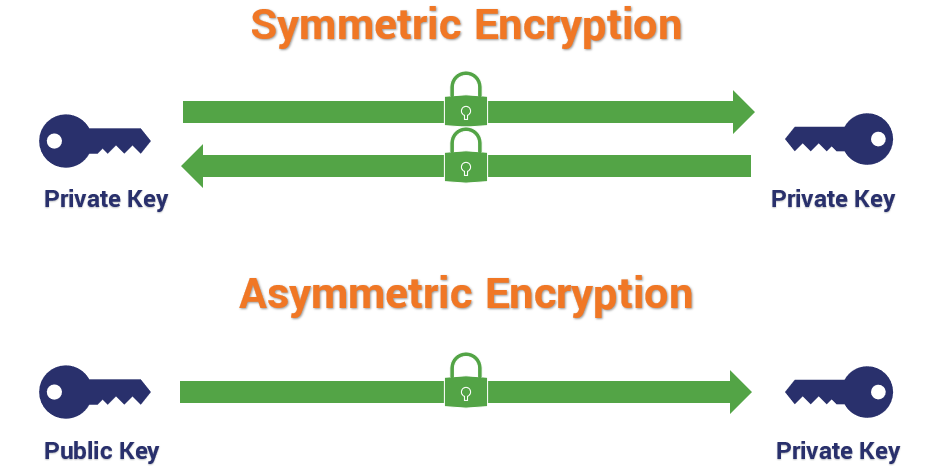
Conversely, with asymmetric encryption, you are talking about different keys with different abilities. When encryption is asymmetric, one key encrypts and the other key decrypts. Asymmetric encryption, which typically takes the form of RSA with TLS 1.2, is responsible for verifying digital signatures and, when RSA key exchange is in use, it’s for encrypting the pre-master secret that will be used to derive the symmetric session key. But RSA is not the only key exchange mechanism in use, so 2048-bit keys are actually kind of an odd thing to advertise.
Symmetric encryption keys, which are typically AES or Advanced Encryption Standard, range from 128-bit to 256-bit in key size. And this is completely efficient and secure for symmetric encryption, where computational hardness needs to go hand-in-hand with usability/performance.
How strong is 256-bit Encryption?
In Everything Encryption By Patrick Nohe
256-bit encryption strength gets tossed around all the time, but most people have no idea what 256 bits of security means or how strong it actually is. Let’s hash it out.
Those 2048-bit asymmetric RSA keys are expensive to compute with, and add latency to handshakes. They’re also vulnerable to padding attacks in some implementations.
Long story short, both asymmetric encryption and symmetric encryption are represented here, but the symmetric encryption is more relevant in the context of cipher suites.
Now let’s look at the four different components of a cipher suite.
The first spot in the TLS 1.2 cipher suite is designated for the key exchange mechanism that will be used.

Key exchange refers to the actual process that’s used to transmit those symmetric session keys (or the key shares they’re derived from), but it’s not the only algorithm used in the generation process. That’s confusing, I know. The key exchange portion of the handshake determines the parameters for the key generation, but the hashing algorithm also plays a role in generating keys by providing Pseudo-Random Functions (PRFs), typically as a cryptographically secure pseudo-random number generator (CSPRNG).
The important thing to take away is that the key exchange mechanism that’s chosen isn’t solely responsible for generating the actual key.
RSA is named after the gentlemen that created it: Rivest, Shamir and Adleman. This is the most common asymmetric cryptosystem. It uses exponentiation of prime numbers and has a wide range of applications. With SSL/TLS you commonly see RSA used in the context of key exchange. Again, this is where all those 2048-bit (and 3072- and 4096-bit) keys come from.
Every handshake, regardless of whether or not RSA is chosen, begins with a Client and Server Hello where they exchanged randoms, a client random and a server random.
The way RSA operates is fairly simple, once the client and server decide to use a cipher suite that includes RSA key exchange – and after the client has authenticated the server:

It’s during those last two steps, 3 & 4, when mixing the master secret and deriving the session key, where the hashing algorithm’s pseudo-random functions are leveraged.
RSA key exchange has been useful for a long time, but it’s at the end of its life. TLS 1.3 has done away with RSA key exchange – in addition to all other static key exchange mechanisms – because of known vulnerabilities.
Named after Whitfield Diffie and Martin Hellman, this is a key exchange protocol, it’s NOT an asymmetric encryption protocol in the same vein as RSA though. The problem that Diffie and Hellman (using work inspired by Ralph Merkle) set out to solve was how to exchange a secure key over an unsecure network with an attacker watching.
What they came up with was Diffie-Hellman key exchange, which was eventually succeeded by RSA, but has now re-taken the advantage.
Diffie-Hellman key exchange works like this:
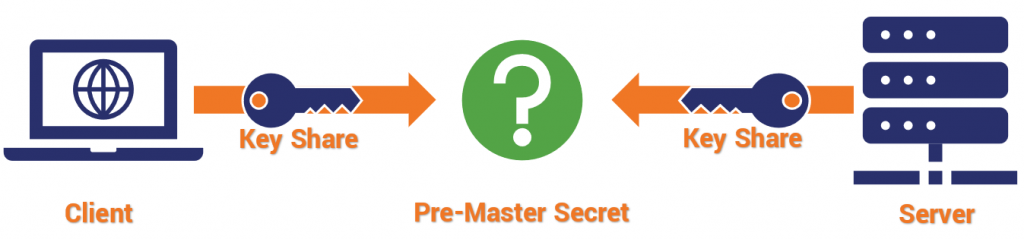
Each party provides what is called a “key share,” and they each arrive independently at the shared session key. There is a rule of modular exponentiation that dictates this.
If that was a lot of math, the key takeaway is that: with Diffie-Hellman no asymmetric encryption actually takes place during the key exchange, rather the two parties mutually arrive at values that can be used to derive the session key.
Now let’s talk about Elliptic Curve Diffie-Hellman, which is basically just a modern-day iteration of Diffie-Hellman undergirded by elliptic curve cryptography as opposed to some other cryptosystem. Basically, it uses points plotted on an elliptic curve as the basis for its calculations.
There are a couple of things to keep in mind with Diffie-Hellman, first of all – it lacks a true authentication mechanism when being used ephemerally. Ephemeral keys are temporary and usually not authenticated.
Second, as we just mentioned, in TLS 1.3 all static key generation/exchange mechanisms were deprecated. That’s what basically killed RSA, and it also does away with DH schemes that aren’t ephemeral, too. ECDHE or Elliptic Curve Diffie-Hellman Ephemeral is now the standard for key exchange.
That’s because Perfect Forward Secrecy is mandatory in TLS 1.3. Perfect Forward Secrecy protects individual sessions from being decrypted, even in the event a certificate’s private key is compromised. Static key exchange schemes couldn’t support that. Ergo, they’re gone.
Typically written as TLS-PSK, this is a cipher that provides secure communication based on pre-shared symmetric keys exchanged between parties in advance. We’re not going to spend a lot of time on PSK as it’s fairly rare outside of highly regulated network environments and we definitely wouldn’t advice its commercial use. It was not included in TLS 1.3.
Here’s where things start to get confusing – and you can also begin to see how these cipher suites have multiple permutations. For example, there are four common iterations of Diffie-Hellman:
But none of those can handle authentication, so they have to be paired with an authentication scheme – historically, that’s been either DSA, RSA or ECDSA.
RSA can function as BOTH a key exchange mechanism, as well as provide authentication with digital signatures. You can even use Diffie-Hellman and RSA together. All these combinations and we’re not even halfway through the cipher suite.
The Signature algorithm is the second algorithm in the TLS 1.2 cipher suite.

One more thing, you sometimes people refer to the type of SSL certificate on the basis of its signing algorithm. For instance, when someone says they have an RSA SSL certificate or an Elliptic Curve SSL certificate, they’re alluding to the signing algorithm. That’s because this is determined during the generation of the CSR. Keep that in mind, because it’s part of why TLS 1.3 cipher suites don’t include the signing scheme.

Digital Signatures are one of the best ways to authenticate another party. Using the digital signature, the client can verify the authenticity of the SSL/TLS certificate, and in the case of cipher suites using Diffie-Hellman, verify ownership of the public/private key pair.
With RSA, the client (and sometimes the server if a client SSL certificate is in use) checks the authenticity of the certificate being presented by running a series of checks. It looks at the certificate chain by following the digital signatures left by the signing CA back to one of the roots in its trust store. It checks the validity dates and the revocation status of the certificate, too. Then it uses the associated public key to verify the private key’s signature.
The final verification that the server is in possession of the private key comes during the key exchange, when the client encrypts the pre-master secret with the public key and the server decrypts it with private key.

As we mentioned earlier, Diffie-Hellman key exchange has no authentication mechanism in ephemeral mode. That means it needs to be paired with an authentication mechanism. As we just covered, RSA is an option, the other popular method is called the Elliptic Curve Digital Signature Algorithm, which has now replaced DSA. The way ECDSA works is very similar to RSA at the outset, but with one major difference.
Whereas both methods check the certificate the same way, when Diffie Hellman is in use the actual key exchange portion can’t be used to prove possession of the private key. Instead, the server takes the two randoms (client and server) as well as the Diffie-Hellman parameters it has chosen (its pre-master secret) and encrypts them all with its private key. This serves as its de facto digital signature. The client will use the public key to verify the signature and thus, ownership of the private key.
The Digital Signature Algorithm, which was already on its way out, has been entirely removed from TLS 1.3. While there is some debate over how secure DSA still is, what really hamstrung it was key size. DSA uses keys that are comparable in size to RSA: 1024-, 2048-, 3096-bit keys, that – as we covered – are expensive to compute with. By comparison, it’s Elliptic Curve-based counterpart, ECDSA, uses keys that are typically 224- or 256-bit.
EdDSA is a digital signature scheme that removes the need for pseudo-random number generation from the equation. We touched on PRFs earlier, they’re typically generated using the designated hash function, but they’re not always actually random. In fact, the secret values that are produced, which are sometimes called nonces, can leak private keys if the RNG is ever broken/made predictable.
Instead, EdDSA picks a nonce based on a hash of the private key and the message, which means after the private key is generated there’s no more need for random number generators. EdDSA is one of the three digital signature schemes approved for use in TLS 1.3.
While neither of the previous two categories are included in TLS 1.3 cipher suites, these next two – bulk ciphers and hashing algorithms – are included.
Your bulk cipher is what will be used for the actual symmetric encryption that will occur during an HTTPS connection. Traditionally there are two kinds of bulk cipher:
A block cipher, as its name might suggest, encrypts data in blocks of a pre-determined size. Unlike with asymmetric encryption though, this isn’t necessarily linked to key size. A 256-bit key doesn’t always create 256-bit blocks of ciphertext. For instance, AES produces 128-bit blocks, regardless of key size.
At any rate, after data is encrypted into blocks, it’s then incumbent upon the recipient to decrypt the blocks and piece them back together so that the information is intelligible.
So, what happens if the data being encrypted isn’t exactly the right size? That’s extremely common. It means the data needs to be segmented into appropriately sized chunks, and any unfilled space needs to be padded with throwaway data to make it fit, which can open attack vectors and is just, generally, inefficient.
The other type of cipher is a stream cipher, which encrypts data in long pseudorandom streams. When you see the cipher written out, the bulk cipher is the third algorithm listed and it typically includes a modifier that dictates how the bulk cipher should be run.

For instance, in the example above we’re running AES or Advanced Encryption Standard, running in GCM or Galois Counter Mode, using 256-bit keys. AES is, by design, a block cipher. But it can be run as a stream cipher in counter mode.
We’ll get to it in a second, but in TLS 1.3, the bulk cipher is now expected to be an AEAD or Authenticated Encryption with Associated Data algorithm, meaning that it can not only encrypt the communication but also authenticate it. Originally these two functions had been performed separately, but issues with errors, and just difficulty implementing it correctly in general, motivated the IETF to combine the two functions in TLS 1.3.
We’ll get into the authentication portion of the AEAD when we discuss hashing algorithms in the next section.

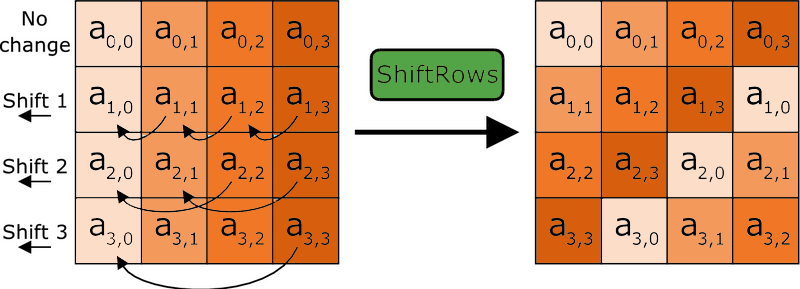
Advanced Encryption Standard, a.k.a. Rijndael, is a NIST-approved encryption cipher with a block size of 128 bits, and symmetric keys with lengths of either 128, 192 or 256 bits. It’s actually the first and only publicly available cipher that’s approved by the NSA to encrypt “Top Secret” data. AES was the successor to the Data Encryption Standard, which was first published in 1977.
AES works in an interesting way. It operates on 4 x 4 arrays of bites called a “state.” As we just said, AES is naturally a block cipher and its blocks are 128 bits. It’s key sizes actually refer to the number of “rounds” that the plaintext will be put through as it’s encrypted.
Each round the plaintext undergoes includes substitutions from a lookup table, rows shifted cyclically and a linear mixing operation that combines the four bytes in each column. For decryption a set of reverse rounds is used.
AES is the most commonly supported bulk cipher in TLS 1.2 & TLS 1.3 cipher suites. When run in Galois Counter Mode and CCM (Counter with CBC_MAC) mode, AES functions as a stream cipher with message authentication capabilities (an AEAD).
CBC just means that AES is being run in block cipher mode. I realize that may be confusing because we just discussed how block ciphers aren’t supported by TLS 1.3. With CCM, the counter mode means you’re running the cipher in stream mode, the CBC_MAC portion is for the message authentication part of the AEAD.
CHACHA20_POLY1305 is a relatively new option for SSL/TLS, having been finalized in 2015. It’s a stream cipher that works alongside POLY1305, which works as an authenticator to accomplish AEAD. CHACHA is much faster than AES in software-only implementations. It’s about 3 times faster on platforms that don’t have specialized AES hardware. Both CHACHA and POLY1305 are considered easy to implement and provide excellent performance.

CHACHA20_POLY1305 uses a 256-bit key and a 96-bit nonce. During the encryption/authentication process, a one-time POLY1305 key is generated from the 256-bit key and the nonce. CHACHA20 then performs its encryption, using the same key and nonce. Finally, POLY1305 authenticates the message. The output is a piece of ciphertext the same length as the plaintext that was input, as well as a 128-bit MAC tag.
POLY1305 can also be used as a hashing algorithm on its own.
Here are some ill-advised SSL ciphers from handshakes past.
The Data Encryption Standard, originally nicknamed Lucifer, was the first publicly available civilian block cipher. The version of DES we know today is a revised version of the original. DES is more notable for what it inspired than what it actually does. It’s encryption, by today’s standards, is fairly pedestrian with block sizes of 64 bits and a key size of 56 bits. Those key sizes were already considered worrisome as early as the 1970s, but by 1998 the EFF had demonstrated a special-purpose machine designed just to break DES and that was pretty much the final nail in its coffin.
Triple DES is an extension of DES that triple-encrypts each block with either two or three different keys. This still is sufficient for many regulatory bodies though. NIST, for instance, only allows Triple DES in its three-key version. And even at that, 3DES only provides 112 bits of security.

Ron’s Code 4 or Rivest Cipher 4 – it’s known by both names – invented by RSA’s Ron Rivest, is impressive for its speed and simplicity. It is no longer, however, impressive for its security, which has been shown to be wanting across multiple vulnerabilities. Originally a trade secret, it was leaked in September 1994 to a mailing list and then cracked within days.
Though it was originally recommended as a workaround for the BEAST attacks back in 2011, by 2013 new attacks demonstrated that it would be feasible to break RC4-encrypted TLS. Improvements to the attacks in 2015 made it even more viable and within months RC4 had been deprecated. RC4 has two successors in RC5 & RC6, neither is acceptable for TLS 1.3.
A symmetric key block cipher with similar capabilities and key sizes to AES. It was developed in Japan by NTT and Mitsubishi and is approved by the ISO/IEC, EU and the Japanese CRYPTREC project. As of now, in its full implementation Camellia has not been broke. While there were Camellia TLS 1.2 cipher suites, it’s not included in TLS 1.3.
Another block cipher that is similar to AES, ARIA was developed by a group of researchers in South Korea in 2003. Like AES, its key sizes refer to the number of rounds that occur during encryption. Like Camellia, it is also not included in TLS 1.3.
Not to be confused with server/client authentication, the hashing algorithm that has traditionally been associated with SSL/TLS has historically handled message authentication and pseudo-random functions. As we’ll discuss in just a moment, that’s been rethought for TLS 1.3, with HKMF or HMAC-based key derivation function.
Let’s start with TLS 1.2 and the Hash-Based Message Authentication Code which has traditionally appeared as the fourth algorithm in the cipher suite.

This is a type of message authentication that uses cryptographic hashes to both authenticate a message and ensure data integrity. Historically this has been done by two main cipher families: MD5 and SHA.

MD5 is totally outmoded now. It was once a highly used hash function that produced 128-bit digests or hash values. When you hash something, you’re mapping data of any length to a fixed-length output. In order for a hashing algorithm to be considered secure, it has to be resistant to collisions. A collision occurs when two disparate inputs create the same value. This renders the algorithm useless. MD5 was found to be embarrassingly insecure around 2012. Collisions can be found trivially on a home computer within seconds.
SHA replaced MD5 and has served adequately ever since. In 2016 the entire SSL/TLS industry shifted away from SHA-1 as the standard hashing algorithm and upgraded to SHA-2. Google managed to create a SHA-1 collision later that year. SHA-2 is still considered a secure hashing algorithm and is included in TLS 1.3. It just plays a different role.
With a traditional HMAC, the message is hashed along with a secret key or Message Authentication Code, we’ll get into HMAC in-depth in the future, the important takeaway is that the hash function basically serves as a check-sum, arriving alongside the ciphertext and indicating whether the message was tampered with. The recipient will use the same key to run the same hash function and compare values.
Historically there has been three different approaches to this:

SSL/TLS, perhaps foolishly, has always used a Mac-then-Encrypt approach for message authentication. Or, more accurately, a MAC-then-Pad-then-Encrypt model. This has been problematic because it opens itself up to padding oracle attacks. It’s also somewhat inefficient, because the client or server have to use resources to decrypt the message first, which is wasteful if it can’t be authenticated. Attackers can actually send a bunch of unauthenticated requests to a server and overwork it by making it decrypt a bunch of garbage.
TLS 1.3 goes in a different direction with AEAD. It MACs and Encrypts simultaneously, shutting the window on padding attacks and saving clients and servers time and resources by making it easier for them to discard unauthenticated messages without having to decrypt them.
Sticking with TLS 1.3, hashing has seen a bit of an overhaul. We just talked about AEAD bulk ciphers, the message authentication that had originally be handled by the HMAC algorithm, has been offloaded to the bulk cipher now.
Instead, focus on the last three words in HKDF: Key Derivation Function.
Let’s go back to the key exchange conversation we had earlier and the pseudo-random functions that were used to mix keys during RSA key exchange and calculate them during Diffie-Hellman. HKDF provides a much more secure, much more random method for deriving those keys.

There are two primary stages: extract and expand.
The extract portion takes key input information (key shares, randoms, pre-master secrets) and optionally a salt, and then extracts a sufficiently secure pseudorandom key.
The expand stage is a mechanism where the algorithm expands the key to requisite size without compromising its computational hardness. RFC 5869, which specifies HKDF makes it extremely clear that the two stages should not be conflated. As we’ve discussed many times, the Random Number Generators that get used for pseudo-random functions are much more fallible than many would care to admit. Especially if the same seeds are re-used by many different implementations. Hence TLS 1.3’s focus on increasing the security of its pseudo-random functions to avoid some of the vulnerabilities that have surfaced lately.
Obviously, this is an incomplete list, there are dozens of other ciphers. But this should at least give you some more context when you see the lists of cipher suites we have in the next section.
Here’s a list of the current RECOMMENDED cipher suites for use with TLS 1.2. We’re not going to publish all 37 of the ciphers that are available. These are the ones that are advisable:
Again, you should be using Ephemeral Diffie-Hellman. Not only is it mandatory in TLS 1.3, it also facilitates Perfect Forward Secrecy, which guards against the decryption of individual sessions in the even the server’s private key is ever compromised.
We’ve tried to point out when things have changed during each section, but we’ll go ahead an give a more comprehensive list here. Let’s start with the makeup of the cipher suite itself, then we’ll go back over the ways that the algorithms themselves have been updated for TLS 1.3 cipher suites.
The biggest thing you’ll notice about TLS 1.3 cipher suites is that they’re much shorter than their TLS 1.2 counterparts. That’s owing to two major things:
That means that the number of negotiations that need to be done when determining encryption parameters has been reduced from four to two.

As you can see, TLS 1.3 cipher suites only include an AEAD bulk cipher and an HKDF.
The client goes into the handshake with the knowledge that Diffie-Hellman Ephemeral scheme will be used for the key exchange process. This means it can send its portion of the key share during the Client Hello.
That, in turn, can cut the TLS 1.3 handshake down to a single roundtrip, where the server responds with all the requisite information for the two parties to derive the session key and begin communicating securely during its Server Hello message.
But the changes go well beyond just the length of the cipher suites and the reduced number of negotiations during the handshake. Things have also been made much more secure.
TLS 1.3 has eliminated:

It’s also dropped support for older, vulnerable SSL ciphers like:
Because the structure of 1.3 cipher suites is different from its predecessors’, TLS 1.3 cipher suites will not be interchangeable with older TLS versions. That essentially means you’re going to need to have two different implementations if you plan on continuing to support TLS 1.2. And there’s nothing wrong with continuing to support TLS 1.2, either.
Until more companies in the hosting community make it a point to transition to TLS 1.3, shutting off TLS 1.2 would be foolish.
You should have already disabled TLS 1.1, TLS 1.0, SSL 3.0 and SSL 2.0 though. The PCI DSS deadline for deprecating SSL 3.0 was last Summer. The deadline for TLS 1.0 and TLS 1.1 is January 2020.
Here are the five TLS 1.3 cipher suites that are supported by OpenSSL right now.
There may be more cipher suites incoming as TLS 1.3 continues to gain its footing, but reducing the number of possible options was also one of the biggest considerations when the IETF was finalizing TLS 1.3, so if there are additional cipher suites added don’t expect the explosion of combinations we saw with the TLS 1.2.
For those that like to skim, here are the key takeaways from today’s conversation:
I recently ran into this typeface and I just LOOOOOVE it! So I’ll put it on my birthday wishlist.
Every once and a while you run into an article on the internet that’s just too good to just make a bookmark (or some similar technique that allows you to store the URL to that previous piece of useful information). I have been on the internet long enough to know that no matter how good an article might be, just wait long enough and it will be gone, some day… So I decided to store these kinds of articles right here, on my own website, in what I call the Article Archive.
This is the first of suchs articles; in which Mark Nottingham dives deep into the realm of caching.
Original: https://www.mnot.net/cache_docs/
for Web Authors and Webmasters
This is an informational document. Although technical in nature, it attempts to make the concepts involved understandable and applicable in real-world situations. Because of this, some aspects of the material are simplified or omitted, for the sake of clarity. If you are interested in the minutia of the subject, please explore the References and Further Information at the end.
A Web cache sits between one or more Web servers (also known as origin servers) and a client or many clients, and watches requests come by, saving copies of the responses — like HTML pages, images and files (collectively known as representations) — for itself. Then, if there is another request for the same URL, it can use the response that it has, instead of asking the origin server for it again.
There are two main reasons that Web caches are used:
If you examine the preferences dialog of any modern Web browser (like Internet Explorer, Safari or Mozilla), you’ll probably notice a “cache” setting. This lets you set aside a section of your computer’s hard disk to store representations that you’ve seen, just for you. The browser cache works according to fairly simple rules. It will check to make sure that the representations are fresh, usually once a session (that is, the once in the current invocation of the browser).
This cache is especially useful when users hit the “back” button or click a link to see a page they’ve just looked at. Also, if you use the same navigation images throughout your site, they’ll be served from browsers’ caches almost instantaneously.
Web proxy caches work on the same principle, but a much larger scale. Proxies serve hundreds or thousands of users in the same way; large corporations and ISPs often set them up on their firewalls, or as standalone devices (also known as intermediaries).
Because proxy caches aren’t part of the client or the origin server, but instead are out on the network, requests have to be routed to them somehow. One way to do this is to use your browser’s proxy setting to manually tell it what proxy to use; another is using interception. Interception proxies have Web requests redirected to them by the underlying network itself, so that clients don’t need to be configured for them, or even know about them.
Proxy caches are a type of shared cache; rather than just having one person using them, they usually have a large number of users, and because of this they are very good at reducing latency and network traffic. That’s because popular representations are reused a number of times.
Also known as “reverse proxy caches” or “surrogate caches,” gateway caches are also intermediaries, but instead of being deployed by network administrators to save bandwidth, they’re typically deployed by Webmasters themselves, to make their sites more scalable, reliable and better performing.
Requests can be routed to gateway caches by a number of methods, but typically some form of load balancer is used to make one or more of them look like the origin server to clients.
Content delivery networks (CDNs) distribute gateway caches throughout the Internet (or a part of it) and sell caching to interested Web sites. Speedera and Akamai are examples of CDNs.
This tutorial focuses mostly on browser and proxy caches, although some of the information is suitable for those interested in gateway caches as well.
Web caching is one of the most misunderstood technologies on the Internet. Webmasters in particular fear losing control of their site, because a proxy cache can “hide” their users from them, making it difficult to see who’s using the site.
Unfortunately for them, even if Web caches didn’t exist, there are too many variables on the Internet to assure that they’ll be able to get an accurate picture of how users see their site. If this is a big concern for you, this tutorial will teach you how to get the statistics you need without making your site cache-unfriendly.
Another concern is that caches can serve content that is out of date, or stale. However, this tutorial can show you how to configure your server to control how your content is cached.
CDNs are an interesting development, because unlike many proxy caches, their gateway caches are aligned with the interests of the Web site being cached, so that these problems aren’t seen. However, even when you use a CDN, you still have to consider that there will be proxy and browser caches downstream.
On the other hand, if you plan your site well, caches can help your Web site load faster, and save load on your server and Internet link. The difference can be dramatic; a site that is difficult to cache may take several seconds to load, while one that takes advantage of caching can seem instantaneous in comparison. Users will appreciate a fast-loading site, and will visit more often.
Think of it this way; many large Internet companies are spending millions of dollars setting up farms of servers around the world to replicate their content, in order to make it as fast to access as possible for their users. Caches do the same for you, and they’re even closer to the end user. Best of all, you don’t have to pay for them.
The fact is that proxy and browser caches will be used whether you like it or not. If you don’t configure your site to be cached correctly, it will be cached using whatever defaults the cache’s administrator decides upon.
All caches have a set of rules that they use to determine when to serve a representation from the cache, if it’s available. Some of these rules are set in the protocols (HTTP 1.0 and 1.1), and some are set by the administrator of the cache (either the user of the browser cache, or the proxy administrator).
Generally speaking, these are the most common rules that are followed (don’t worry if you don’t understand the details, it will be explained below):
If no validator (an ETag or Last-Modified header) is
present on a response, and it doesn’t have any explicit freshness information,
it will usually — but not always — be considered uncacheable.
Together, freshness and validation are the most important ways that a cache works with content. A fresh representation will be available instantly from the cache, while a validated representation will avoid sending the entire representation over again if it hasn’t changed.
There are several tools that Web designers and Webmasters can use to fine-tune how caches will treat their sites. It may require getting your hands a little dirty with your server’s configuration, but the results are worth it. For details on how to use these tools with your server, see the Implementation sections below.
HTML authors can put tags in a document’s <HEAD> section that describe its attributes. These meta tags are often used in the belief that they can mark a document as uncacheable, or expire it at a certain time.
Meta tags are easy to use, but aren’t very effective. That’s because they’re only honored by a few browser caches, not proxy caches (which almost never read the HTML in the document). While it may be tempting to put a Pragma: no-cache meta tag into a Web page, it won’t necessarily cause it to be kept fresh.
If your site is hosted at an ISP or hosting farm and they
don’t give you the ability to set arbitrary HTTP headers (like Expires and
Cache-Control), complain loudly; these are tools necessary for doing your
job.
On the other hand, true HTTP headers give you a lot of control over how both browser caches and proxies handle your representations. They can’t be seen in the HTML, and are usually automatically generated by the Web server. However, you can control them to some degree, depending on the server you use. In the following sections, you’ll see what HTTP headers are interesting, and how to apply them to your site.
HTTP headers are sent by the server before the HTML, and only seen by the browser and any intermediate caches. Typical HTTP 1.1 response headers might look like this:
HTTP/1.1 200 OK
Date: Fri, 30 Oct 1998 13:19:41 GMT
Server: Apache/1.3.3 (Unix)
Cache-Control: max-age=3600, must-revalidate
Expires: Fri, 30 Oct 1998 14:19:41 GMT
Last-Modified: Mon, 29 Jun 1998 02:28:12 GMT
ETag: "3e86-410-3596fbbc"
Content-Length: 1040
Content-Type: text/html
The HTML would follow these headers, separated by a blank line. See the Implementation sections for information about how to set HTTP headers.
Many people believe that assigning a Pragma: no-cache HTTP header to a
representation will make it uncacheable. This is not necessarily true; the
HTTP specification does not set any guidelines for Pragma response headers;
instead, Pragma request headers (the headers that a browser sends to a server)
are discussed. Although a few caches may honor this header, the majority
won’t, and it won’t have any effect. Use the headers below instead.
The Expires HTTP header is a basic means of controlling caches; it tells
all caches how long the associated representation is fresh for. After that
time, caches will always check back with the origin server to see if a
document is changed. Expires headers are supported by practically every
cache.
Most Web servers allow you to set Expires response headers in a number of
ways. Commonly, they will allow setting an absolute time to expire, a time
based on the last time that the client retrieved the representation (last access
time), or a time based on the last time the document changed on your
server (last modification time).
Expires headers are especially good for making static images (like
navigation bars and buttons) cacheable. Because they don’t change much, you
can set extremely long expiry time on them, making your site appear much more
responsive to your users. They’re also useful for controlling caching of a
page that is regularly changed. For instance, if you update a news page once a
day at 6am, you can set the representation to expire at that time, so caches
will know when to get a fresh copy, without users having to hit ‘reload’.
The only value valid in an Expires header is a HTTP date;
anything else will most likely be interpreted as ‘in the past’, so that the
representation is uncacheable. Also, remember that the time in a HTTP date is
Greenwich Mean Time (GMT), not local time.
For example:
Expires: Fri, 30 Oct 1998 14:19:41 GMT
It’s important to make sure that your Web
server’s clock is accurate if you use the Expires header.
One way to do this is using the Network Time
Protocol (NTP); talk to your local system administrator to find out
more.
Although the Expires header is useful, it has some limitations. First,
because there’s a date involved, the clocks on the Web server and the cache
must be synchronised; if they have a different idea of the time, the intended
results won’t be achieved, and caches might wrongly consider stale content as
fresh.
Another problem with Expires is that it’s easy to forget that you’ve set
some content to expire at a particular time. If you don’t update an Expires
time before it passes, each and every request will go back to your Web server,
increasing load and latency.
HTTP 1.1 introduced a new class of headers, Cache-Control response
headers, to give Web publishers more control over their content, and
to address the limitations of Expires.
Useful Cache-Control response headers include:
max-age=[seconds] — specifies the maximum amount of
time that a representation will be considered fresh. Similar to Expires,
this directive is relative to the time of the request, rather than absolute.
[seconds]
is the number of seconds from the time of the request you wish the
representation to be fresh for.
s-maxage=[seconds] — similar to max-age, except that it
only applies to shared (e.g., proxy) caches.
public — marks authenticated responses as cacheable;
normally, if HTTP authentication is required, responses are automatically private.
private — allows caches that are specific to one user (e.g., in a
browser) to store the response; shared caches (e.g., in a proxy) may not.
no-cache — forces caches to submit the request to the
origin server for validation before releasing a cached copy, every time.
This is useful to assure that authentication is respected (in combination
with public), or to maintain rigid freshness, without sacrificing all of the
benefits of caching.
no-store — instructs caches not to keep a copy of the
representation under any conditions.
must-revalidate — tells caches that they must obey any
freshness information you give them about a representation. HTTP allows
caches to serve stale representations under special conditions; by
specifying this header, you’re telling the cache that you want it to
strictly follow your rules.
proxy-revalidate — similar to must-revalidate, except
that it only applies to proxy caches.
For example:
Cache-Control: max-age=3600, must-revalidate
When both Cache-Control and Expires are present,
Cache-Control takes precedence. If you plan to use the
Cache-Control headers, you should have a look at the excellent
documentation in HTTP 1.1; see References and Further
Information.
In How Web Caches Work, we said that validation is used by servers and caches to communicate when a representation has changed. By using it, caches avoid having to download the entire representation when they already have a copy locally, but they’re not sure if it’s still fresh.
Validators are very important; if one isn’t present, and there isn’t any
freshness information (Expires or Cache-Control) available, caches will
not store a representation at all.
The most common validator is the time that the document last changed, as
communicated in Last-Modified header. When a cache has a
representation stored that includes a Last-Modified header, it can use it to
ask the server if the representation has changed since the last time it was
seen, with an If-Modified-Since request.
HTTP 1.1 introduced a new kind of validator called the ETag. ETags
are unique identifiers that are generated by the server and changed every time
the representation does. Because the server controls how the ETag is
generated, caches can be sure that if the ETag matches when they make a
If-None-Match request, the representation really is the same.
Almost all caches use Last-Modified times as validators; ETag validation is also becoming prevalent.
Most modern Web servers will generate both ETag and Last-Modified
headers to use as validators for static content (i.e., files) automatically; you won’t have to
do anything. However, they don’t know enough about dynamic content (like CGI,
ASP or database sites) to generate them; see Writing
Cache-Aware Scripts.
Besides using freshness information and validation, there are a number of other things you can do to make your site more cache-friendly.
Cache-Control: max-age header with a large
value.Last-Modified date. For instance,
when updating your site, don’t copy over the entire site; just move the
files that you’ve changed.By default, most scripts won’t return a validator (a Last-Modified
or ETag response header) or freshness information (Expires or Cache-Control).
While some scripts really are dynamic (meaning that they return a different
response for every request), many (like search engines and database-driven
sites) can benefit from being cache-friendly.
Generally speaking, if a script produces output that is reproducible with the same request at a later time (whether it be minutes or days later), it should be cacheable. If the content of the script changes only depending on what’s in the URL, it is cacheable; if the output depends on a cookie, authentication information or other external criteria, it probably isn’t.
Last-Modified times are preserved.Expires, it’s probably easiest to do so with
Cache-Control: max-age, which will make the request fresh for an amount
of time after the request.If-Modified-Since and/or If-None-Match
requests. This can be done by parsing the HTTP headers, and then
responding with 304 Not Modified when appropriate. Unfortunately, this is
not a trival task.Some other tips;
Content-Length response headers. It’s easy to
do, and it will allow the response of your script to be used in a
persistent connection. This allows clients to request
multiple representations on one TCP/IP connection, instead of setting up a
connection for every request. It makes your site seem much faster.See the Implementation Notes for more specific information.
A good strategy is to identify the most popular, largest representations (especially images) and work with them first.
The most cacheable representation is one with a long freshness time set. Validation does help reduce the time that it takes to see a representation, but the cache still has to contact the origin server to see if it’s fresh. If the cache already knows it’s fresh, it will be served directly.
If you must know every time a page is accessed, select ONE small item on
a page (or the page itself), and make it uncacheable, by giving it a suitable
headers. For example, you could refer to a 1×1 transparent uncacheable image
from each page. The Referer header will contain information about what page
called it.
Be aware that even this will not give truly accurate statistics about your users, and is unfriendly to the Internet and your users; it generates unnecessary traffic, and forces people to wait for that uncached item to be downloaded. For more information about this, see On Interpreting Access Statistics in the references.
Many Web browsers let you see the Expires and Last-Modified headers are in
a “page info” or similar interface. If available, this will give you a menu of
the page and any representations (like images) associated with it, along with
their details.
To see the full headers of a representation, you can manually connect to the Web server using a Telnet client.
To do so, you may need to type the port (be default, 80) into a separate
field, or you may need to connect to www.example.com:80 or www.example.com 80
(note the space). Consult your Telnet client’s documentation.
Once you’ve opened a connection to the site, type a request for the
representation. For instance, if you want to see the headers for
http://www.example.com/foo.html, connect to www.example.com, port 80, and
type:
GET /foo.html HTTP/1.1 [return]
Host: www.example.com [return][return]
Press the Return key every time you see [return]; make sure to press it
twice at the end. This will print the headers, and then the full
representation. To see the headers only, substitute HEAD for GET.
By default, pages protected with HTTP authentication are considered private; they will not be kept by shared caches. However, you can make authenticated pages public with a Cache-Control: public header; HTTP 1.1-compliant caches will then allow them to be cached.
If you’d like such pages to be cacheable, but still authenticated for every
user, combine the Cache-Control: public and no-cache headers. This tells the
cache that it must submit the new client’s authentication information to the
origin server before releasing the representation from the cache. This would look like:
Cache-Control: public, no-cache
Whether or not this is done, it’s best to minimize use of authentication; for example, if your images are not sensitive, put them in a separate directory and configure your server not to force authentication for it. That way, those images will be naturally cacheable.
https:// pages are not cached (or decrypted) by proxy caches, so you don’t have
to worry about that. However, because caches store http:// responses and URLs
fetched through them, you should be conscious about unsecured sites; an
unscrupulous administrator could conceivably gather information about their
users, especially in the URL.
In fact, any administrator on the network between your server and your clients could gather this type of information. One particular problem is when CGI scripts put usernames and passwords in the URL itself; this makes it trivial for others to find and use their login.
If you’re aware of the issues surrounding Web security in general, you shouldn’t have any surprises from proxy caches.
It varies. Generally speaking, the more complex a solution is, the more difficult it is to cache. The worst are ones which dynamically generate all content and don’t provide validators; they may not be cacheable at all. Speak with your vendor’s technical staff for more information, and see the Implementation notes below.
The Expires header can’t be circumvented; unless the cache (either browser or proxy) runs out of room and has to delete the representations, the cached copy will be used until then.
The most effective solution is to change any links to them; that way, completely new representations will be loaded fresh from the origin server. Remember that any page that refers to these representations will be cached as well. Because of this, it’s best to make static images and similar representations very cacheable, while keeping the HTML pages that refer to them on a tight leash.
If you want to reload a representation from a specific cache, you can
either force a reload (in Firefox, holding down shift while pressing ‘reload’
will do this by issuing a Pragma: no-cache request header) while using the
cache. Or, you can have the cache administrator delete the representation
through their interface.
If you’re using Apache, consider allowing them to use .htaccess files and providing appropriate documentation.
Otherwise, you can establish predetermined areas for various caching attributes in each virtual server. For instance, you could specify a directory /cache-1m that will be cached for one month after access, and a /no-cache area that will be served with headers instructing caches not to store representations from it.
Whatever you are able to do, it is best to work with your largest customers first on caching. Most of the savings (in bandwidth and in load on your servers) will be realized from high-volume sites.
Caches aren’t required to keep a representation and reuse it; they’re only required to not keep or use them under some conditions. All caches make decisions about which representations to keep based upon their size, type (e.g., image vs. html), or by how much space they have left to keep local copies. Yours may not be considered worth keeping around, compared to more popular or larger representations.
Some caches do allow their administrators to prioritize what kinds of representations are kept, and some allow representations to be “pinned” in cache, so that they’re always available.
Generally speaking, it’s best to use the latest version of whatever Web server you’ve chosen to deploy. Not only will they likely contain more cache-friendly features, new versions also usually have important security and performance improvements.
Apache uses optional modules to include headers, including both Expires and Cache-Control. Both modules are available in the 1.2 or greater distribution.
The modules need to be built into Apache; although they are included in
the distribution, they are not turned on by default. To find out if the
modules are enabled in your server, find the httpd binary and run httpd
-l; this should print a list of the available modules (note that this only
lists compiled-in modules; on later versions of Apache, use httpd -M
to include dynamically loaded modules as well). The modules we’re
looking for are expires_module and headers_module.
-enable-module=expires and -enable-module=headers
arguments to configure (1.3 or greater). Consult the INSTALL file found
with the Apache distribution.Once you have an Apache with the appropriate modules, you can use mod_expires to specify when representations should expire, either in .htaccess files or in the server’s access.conf file. You can specify expiry from either access or modification time, and apply it to a file type or as a default. See the module documentation for more information, and speak with your local Apache guru if you have trouble.
To apply Cache-Control headers, you’ll need to use the mod_headers module,
which allows you to specify arbitrary HTTP headers for a resource. See the
mod_headers documentation.
Here’s an example .htaccess file that demonstrates the use of some headers.
### activate mod_expires
ExpiresActive On
### Expire .gif's 1 month from when they're accessed
ExpiresByType image/gif A2592000
### Expire everything else 1 day from when it's last modified
### (this uses the Alternative syntax)
ExpiresDefault "modification plus 1 day"
### Apply a Cache-Control header to index.html
<Files index.html>
Header append Cache-Control "public, must-revalidate"
</Files>
Cache-Control:max-age header as appropriate.Apache 2’s configuration is very similar to that of 1.3; see the 2.2 mod_expires and mod_headers documentation for more information.
Microsoft’s Internet Information Server makes it very easy to set headers in a somewhat flexible way. Note that this is only possible in version 4 of the server, which will run only on NT Server.
To specify headers for an area of a site, select it in the
Administration Tools interface, and bring up its properties. After
selecting the HTTP Headers tab, you should see two interesting
areas; Enable Content Expiration and Custom HTTP headers.
The first should be self-explanatory, and the second can be used to apply
Cache-Control headers.
See the ASP section below for information about setting headers in Active Server Pages. It is also possible to set headers from ISAPI modules; refer to MSDN for details.
As of version 3.6, Enterprise Server does not provide any obvious way to set Expires headers. However, it has supported HTTP 1.1 features since version 3.0. This means that HTTP 1.1 caches (proxy and browser) will be able to take advantage of Cache-Control settings you make.
To use Cache-Control headers, choose Content Management | Cache Control
Directives in the administration server. Then, using the Resource Picker,
choose the directory where you want to set the headers. After setting the
headers, click ‘OK’. For more information, see the NES manual.
One thing to keep in mind is that it may be easier to set HTTP headers with your Web server rather than in the scripting language. Try both.
Because the emphasis in server-side scripting is on dynamic content, it doesn’t make for very cacheable pages, even when the content could be cached. If your content changes often, but not on every page hit, consider setting a Cache-Control: max-age header; most users access pages again in a relatively short period of time. For instance, when users hit the ‘back’ button, if there isn’t any validator or freshness information available, they’ll have to wait until the page is re-downloaded from the server to see it.
CGI scripts are one of the most popular ways to generate content. You can
easily append HTTP response headers by adding them before you send the body;
Most CGI implementations already require you to do this for the
Content-Type header. For instance, in Perl;
#!/usr/bin/perl
print "Content-type: text/html\n";
print "Expires: Thu, 29 Oct 1998 17:04:19 GMT\n";
print "\n";
### the content body follows...
Since it’s all text, you can easily generate Expires and other
date-related headers with in-built functions. It’s even easier if you use
Cache-Control: max-age;
print "Cache-Control: max-age=600\n";
This will make the script cacheable for 10 minutes after the request, so that if the user hits the ‘back’ button, they won’t be resubmitting the request.
The CGI specification also makes request headers that the client sends
available in the environment of the script; each header has ‘HTTP_’ prepended
to its name. So, if a client makes an If-Modified-Since request, it will show
up as HTTP_IF_MODIFIED_SINCE.
SSI (often used with the extension .shtml) is one of the first ways that Web publishers were able to get dynamic content into pages. By using special tags in the pages, a limited form of in-HTML scripting was available.
Most implementations of SSI do not set validators, and as such are not
cacheable. However, Apache’s implementation does allow users to specify which
SSI files can be cached, by setting the group execute permissions on the
appropriate files, combined with the XbitHack full directive. For more
information, see the mod_include
documentation.
PHP is a server-side scripting language that, when built into the server, can be used to embed scripts inside a page’s HTML, much like SSI, but with a far larger number of options. PHP can be used as a CGI script on any Web server (Unix or Windows), or as an Apache module.
By default, representations processed by PHP are not assigned validators,
and are therefore uncacheable. However, developers can set HTTP headers by
using the Header() function.
For example, this will create a Cache-Control header, as well as an Expires header three days in the future:
<?php
 Header("Cache-Control: must-revalidate");

 $offset = 60 * 60 * 24 * 3;
 $ExpStr = "Expires: " . gmdate("D, d M Y H:i:s", time() + $offset) . " GMT";
 Header($ExpStr);
?>
Remember that the Header() function MUST come before any other output.
As you can see, you’ll have to create the HTTP date for an Expires header
by hand; PHP doesn’t provide a function to do it for you (although recent
versions have made it easier; see the PHP’s date documentation). Of course, it’s
easy to set a Cache-Control: max-age header, which is just as good for most
situations.
For more information, see the manual entry for header.
Cold Fusion, by Macromedia is a commercial server-side scripting engine, with support for several Web servers on Windows, Linux and several flavors of Unix.
Cold Fusion makes setting arbitrary HTTP headers relatively easy, with the
CFHEADER
tag. Unfortunately, their example for setting an Expires header, as below, is a bit misleading.
<CFHEADER NAME="Expires" VALUE="#Now()#">
It doesn’t work like you might think, because the time (in this case, when the request is made) doesn’t get converted to a HTTP-valid date; instead, it just gets printed as a representation of Cold Fusion’s Date/Time object. Most clients will either ignore such a value, or convert it to a default, like January 1, 1970.
However, Cold Fusion does provide a date formatting function that will do the job;
GetHttpTimeString. In combination with
DateAdd, it’s easy to set Expires dates;
here, we set a header to declare that representations of the page expire in one month;
<cfheader name="Expires"
  value="#GetHttpTimeString(DateAdd('m', 1, Now()))#">
You can also use the CFHEADER tag to set Cache-Control: max-age and other headers.
Remember that Web server headers are passed through in some deployments of Cold Fusion (such as CGI); check yours to determine whether you can use this to your advantage, by setting headers on the server instead of in Cold Fusion.
When setting HTTP headers from ASPs, make sure you either
place the Response method calls before any HTML generation, or use
Response.Buffer to buffer the output. Also, note that some versions of IIS set
a Cache-Control: private header on ASPs by default, and must be declared public
to be cacheable by shared caches.
Active Server Pages, built into IIS and also available for other Web
servers, also allows you to set HTTP headers. For instance, to set an expiry
time, you can use the properties of the Response object;
<% Response.Expires=1440 %>
specifying the number of minutes from the request to expire the
representation. Cache-Control headers can be added like this:
<% Response.CacheControl="public" %>
In ASP.NET, Response.Expires is deprecated; the proper way to set cache-related
headers is with Response.Cache;
Response.Cache.SetExpires ( DateTime.Now.AddMinutes ( 60 ) ) ;
Response.Cache.SetCacheability ( HttpCacheability.Public ) ;
The HTTP 1.1 spec has many extensions for making pages cacheable, and is the authoritative guide to implementing the protocol. See sections 13, 14.9, 14.21, and 14.25.
An excellent introduction to caching concepts, with links to other online resources.
Jeff Goldberg’s informative rant on why you shouldn’t rely on access statistics and hit counters.
Examines HTTP resources to determine how they will interact with Web caches, and generally how well they use the protocol.
This document is Copyright © 1998-2013 Mark Nottingham <mnot@mnot.net>. This work is licensed under a Creative Commons Attribution-Noncommercial-No Derivative Works 3.0 Unported License.
All trademarks within are property of their respective holders.
Although the author believes the contents to be accurate at the time of publication, no liability is assumed for them, their application or any consequences thereof. If any misrepresentations, errors or other need for clarification is found, please contact the author immediately.
The latest revision of this document can always be obtained from https://www.mnot.net/cache_docs/
Translations are available in: Chinese, Czech, German, and French.
25 October, 2017

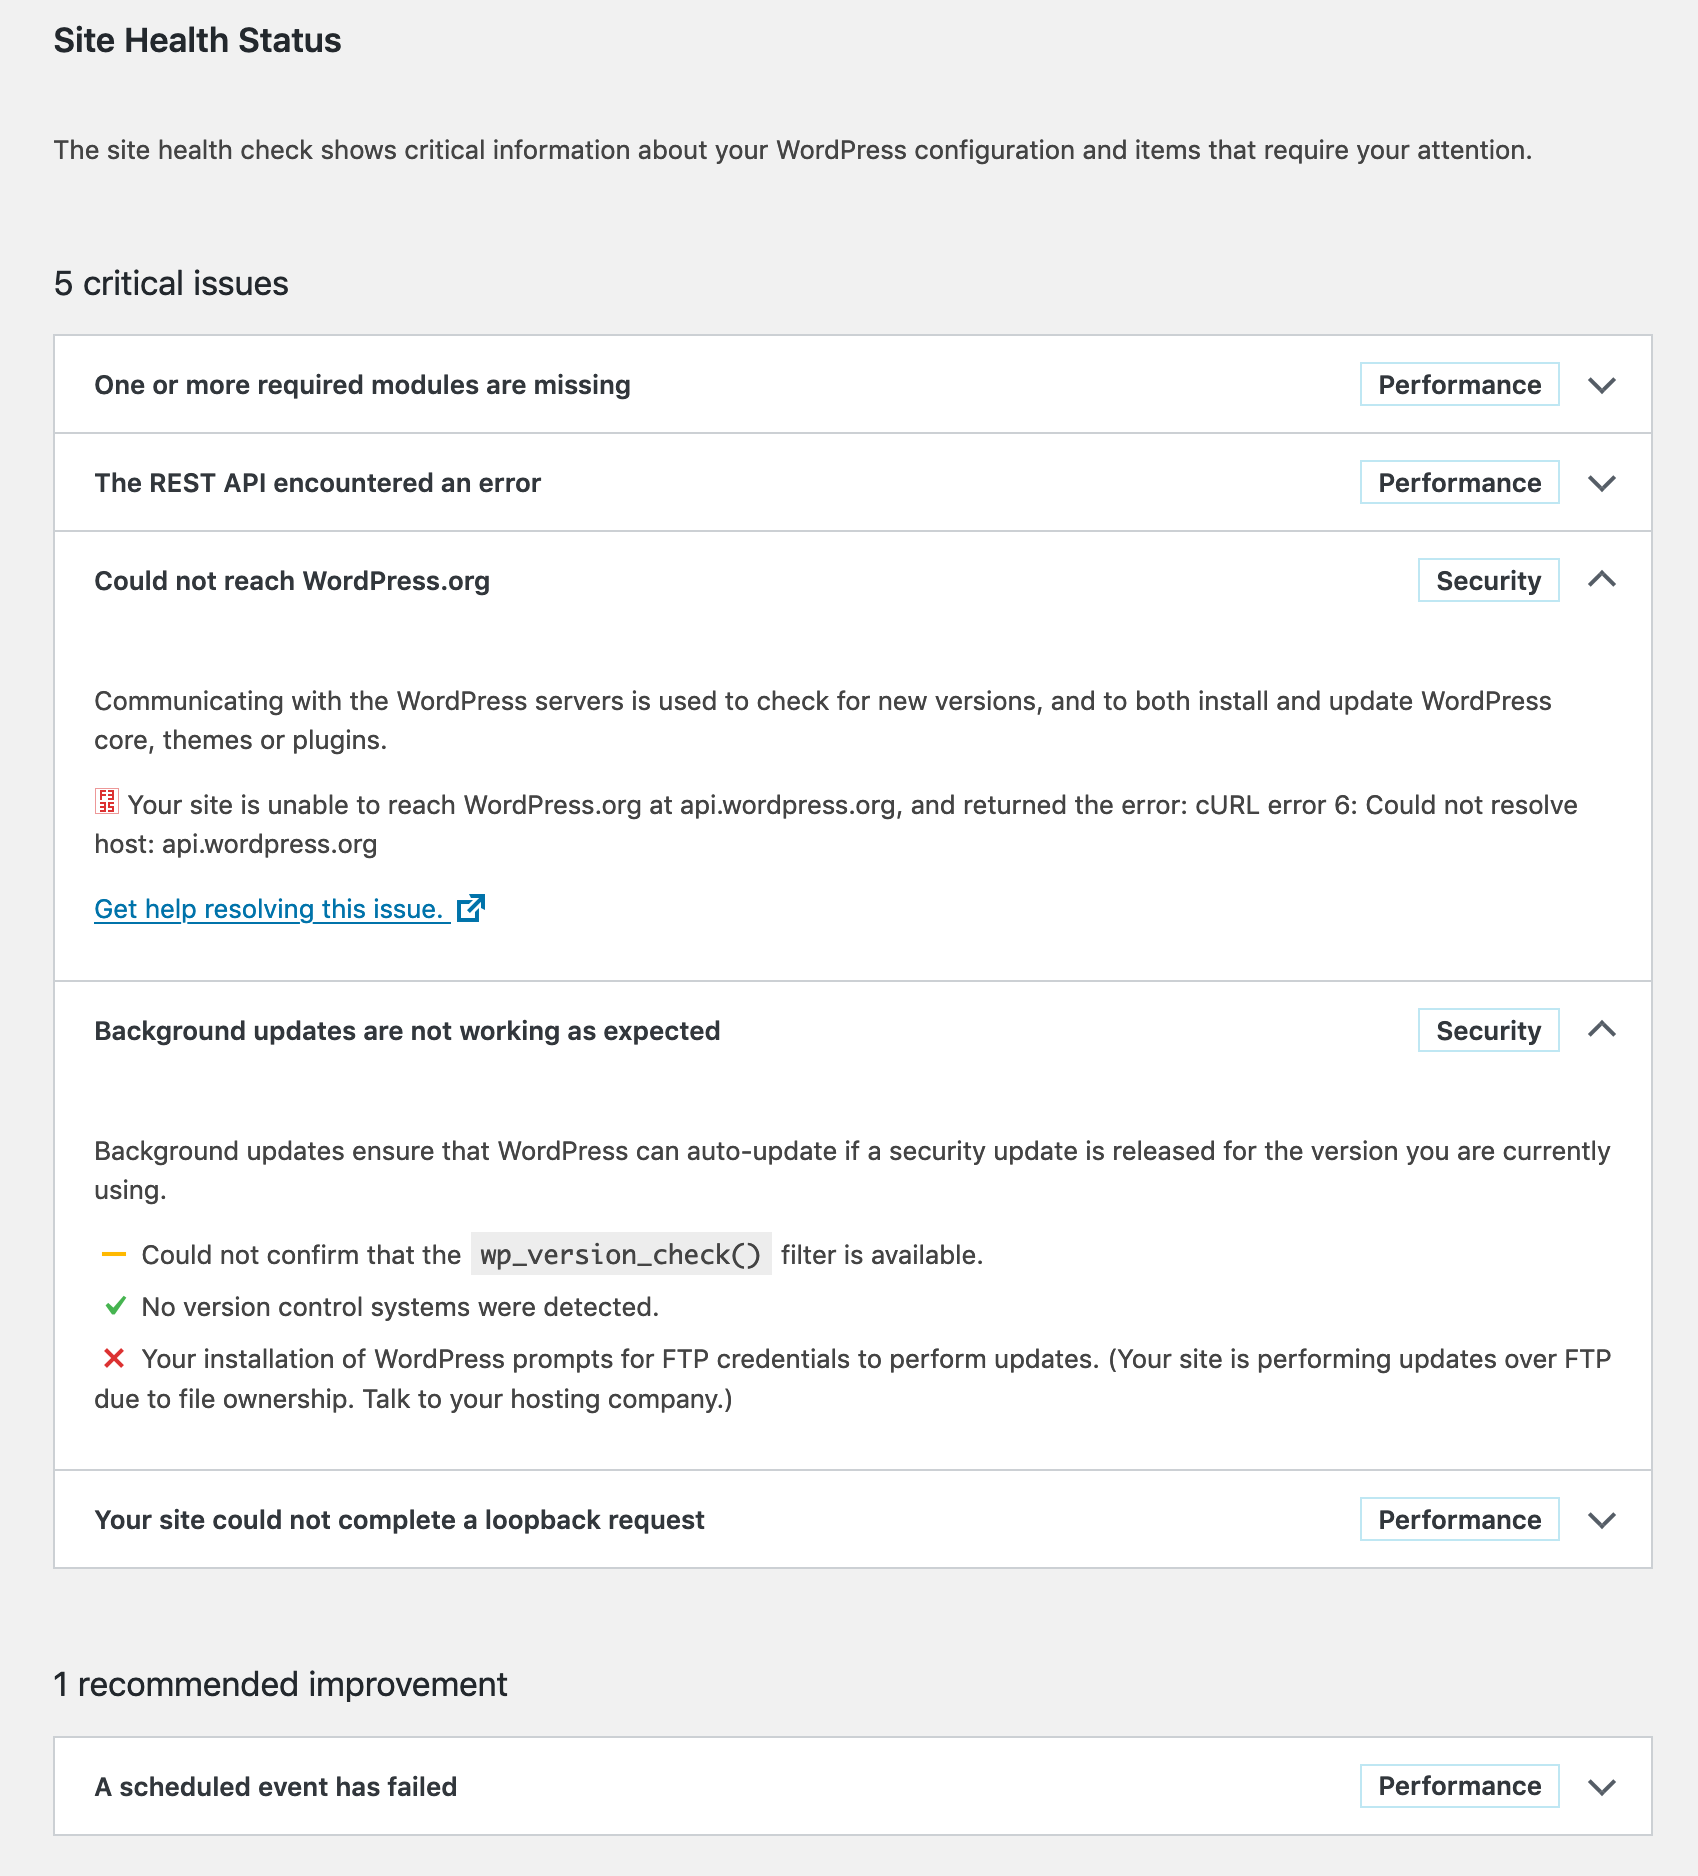
I recenlty moved my WordPress installation to another server; the one it was on was acting slow most of the time, which annoyed me in some cases. But now on the new server I get this bitching screen again when I run Tools > Site Health.
I want a healthy site!
The only required module seams to be gd, so I install it, and the optional zip. I don’t like imagick so I skip that.
$ doas pkg_add php-zip php-gd wget
$ doas mv /etc/php-7.3.sample/* /etc/php-7.3/
$ doas rcctl restart php73_fpmThese three problems all have the same error message:
Error: [] cURL error 6: Could not resolve host: [some domain]
Looks like someone has trouble with dns resolving… Now the weirdest thing is that on my previous server, this was all working just superfine, but on the current server I just don’t get this error out of the way. Google (or any other search-engine) is not of any help. People fixing things with putting stuff in /etc/hosts, or putting the Google DNS servers in /etc/resolv.conf are not fixing problems, just mere circumventing them.
I have done quite some research in this issue and as it turns out any php run thru my webserver is not able to resolve any hosts, functions like gethostbyname or dns_get_record return nothing on this new server (and work like a charm on my old one…. GRRRR!!!)
Also interesting to know is that the functions above work perfectly fine when I run the php-scripts from the command-line:
$ php -f test.php
Array
(
    [0] => Array
        (
            [host] => akira.hku.nl
            [class] => IN
            [ttl] => 100
            [type] => A
            [ip] => 192.87.219.165
        )

)This one is easy to solve, just make sure that the files of WordPress are of the right owner:
$ cd /var/www/vhosts/remyblom.nl/blog
$ doas chown -R www:www .The problem with cURL seems pretty consistent, although my two servers and their installations are so very equal, it’s super-scary. But I will continue the search, other pointers might be:
Man I have been looking into this issue so many times and now, May 2021, installing a new box with OpenBSD, I finally managed to enter the right search-query and FIND THE ANSWER!
$ cd /var/www/
$ doas mkdir etc
$ cd etc
$ doas cp /etc/resolv.conf .It has been almost five years since I wrote an answer to a serverfault question about dynamic vhosting with fallback using Apache. I repost it here on my very own blog, for historic reasons.
RemyNL answered:
I also came across this question googling for apache2 dynamic vhost fallback and Luc’s answer helped me a lot with solving my problem, but I still want to show what I did to achieve my goals, mainly because it involved some extra works and because I think it could be helpful for any future googlers…
My goals
foo.com should serve the same content as www.foo.comfoo.com to www.foo.com unless the www is not available, fallback to default insteadDNS
I have a couple of domains (and all their subdomains) pointing at my VPS, for example:
Filesystem
I have the following directories, domains contain directories with the names of the available subdomains, the www directory is required, but the config should be able to deal with the situation where it is not present. Localhost is used as default fallback:
/var
  /www
    /localhost
    /foo.com
       /www
       /bar
    /bar.com
       /foo
Tests
Translating my goals into testable cases:
The Solution
This uses: mod_rewrite, mod_proxy_http and ofcourse mod_vhost_alias.
ServerName my.domain
ServerAdmin admin@my.domain

<VirtualHost *:80>
    ServerName localhost
    VirtualDocumentRoot /var/www/localhost
</VirtualHost>

<VirtualHost *:80>
    ServerName sub.domain
    ServerAlias *.*.*
    VirtualDocumentRoot /var/www/%-2.0.%-1.0/%-3

    RewriteEngine on

    RewriteCond %{HTTP_HOST} ^(.*)\.(.*)\.(.*)$ [NC]
    RewriteCond /var/www/%2.%3 !-d
    RewriteRule (.*) http://localhost/$1 [P]

    RewriteCond %{HTTP_HOST} ^(.*)\.(.*)\.(.*)$ [NC]
    RewriteCond /var/www/%2.%3/%1 !-d
    RewriteCond /var/www/%2.%3/www !-d
    RewriteRule (.*) http://localhost/$1 [P]

    RewriteCond %{HTTP_HOST} ^(.*)\.(.*)\.(.*)$ [NC]
    RewriteCond /var/www/%2.%3/%1 !-d
    RewriteRule (.*) http://%2.%3/$1 [P]
</VirtualHost>

<VirtualHost *:80>
    ServerName bare.domain
    ServerAlias *.*
    VirtualDocumentRoot /var/www/%-2.0.%-1.0/www

    RewriteEngine on

    RewriteCond %{HTTP_HOST} ^(.*)\.(.*)$ [NC]
    RewriteCond /var/www/%1.%2 !-d [OR]
    RewriteCond /var/www/%1.%2/www !-d
    RewriteRule (.*) http://localhost/$1 [P]
</VirtualHost>
How does this work? There are three virtual hosts defined:
localhost
The localhost serves as a default. All requests that are not resolvable are served by localhost. Setting up a symlink from localhost to any of your domains is like setting up that site as a default.
sub.domain
The sub.domain vhost is taking all requests in the form of *.*.*. By default all requests are served from /domain.com/sub as defined by VirtualDocumentRoot /var/www/%-2.0.%-1.0/%-3.
fallback:
The first RewriteRule takes care of unknown domains, eg. domain.com directory does not exist, by proxying the localhost website.
The second RewriteRule also proxies to localhost when both the domain.com/sub and the domain.com/www directories are not present.
The third RewriteRule proxies to domain.com when domain.com/sub does not exist. We know domain.com/www does exist because of the second rewrite block.
bare.domain
The bare.domain vhost is taking the *.*requests and serves them /domain.com/www
Here the RewriteRule will proxy to localhost when domain.com or domain.com/www do not exist.
^$%.*!!!
I had some trouble wrapping my head around all those $ and % signs in the RewriteCond and RewriteRule so I will explain about them here:
    ServerAlias *.*.*
    VirtualDocumentRoot /var/www/%-2.0.%-1.0/%-3
    RewriteCond %{HTTP_HOST} ^(.*)\.(.*)\.(.*)$ [NC]
    RewriteCond /var/www/%2.%3/%1 !-d
RewriteRule (.*) http://%2.%3/$1 [P]* in the ServerAlias are just wildcards.%n in the VirtualDocumentRoot are from the document name interpolation.%n in the second RewriteCond refer to the selections (.*) from the first RewriteCond, eg. the parts of the requested domain.%n in the RewriteRule do too.$1 in the RewriteRule refers to the selection (.*) at the beginning of the RewriteRule. Which captures everything from the domain till the ? in the request url. Any querystring is automatically added to the url by mod_proxy.On a server with nginx already setup, I wanted to write a php-application that needed SAML-authentication. So let’s install SimpleSAMLphp and configure it and nginx to have the magic going. I presume you have a user with sudo privileges that is also member of the www-data group.
$ cd /var/www
$ sudo chown root:www-data .
$ sudo chmod 775 .
$ wget -O simplesaml.tar.gz https://simplesamlphp.org/download?latest
$ tar xzf simplesaml.tar.gz
$ ln -sf simplesamlphp-1.18.x/ simplesamlphp
Now that we have a simpleSAMLphp installation let’s configure it, edit config/config.php
// I like short baseurlpaths:
'baseurlpath' => 'https://application.example.org/saml/',

// I always fill in the technical contact information:
'technicalcontact_name' => 'Remy Blom',
'technicalcontact_email' => 'na@example.org',

'timezone' => 'Europe/Amsterdam',

// https://passwordsgenerator.net/
// length = 32, include numbers and lowercase characters
'secretsalt' => 'ner9iuf8vu3fqkgawqchu7bcp4ihn221',

// you might want to change this one:
'auth.adminpassword' => '123',

'admin.protectindexpage' => true,
Now let’s setup nginx to serve simpleSAMLphp from the /saml url: in /var/www/html/ I create a symlink:
$ sudo ln -sf /var/www/simplesamlphp/www /var/www/html/samlAnd presuming you already have a serverblock setup that is serving /var/www/html we can add this location-block:
location /saml {
  location ~ ^(?<prefix>/saml)(?<phpfile>.+?\.php)(?<pathinfo>/.*)?$ {
    include snippets/fastcgi-php.conf;
    fastcgi_pass     unix:/var/run/php/php7.2-fpm.sock;
    fastcgi_split_path_info ^((?U).+\.php)(/?.+)$;
  }
}
Reload nginx:
$ sudo nginx -t && sudo service nginx reloadIn /config/authsources.php we put:
<?php

$config = [
  // This is a authentication source which handles admin authentication.
  'admin' => [
    // The default is to use core:AdminPassword, but it can be replaced with
    // any authentication source.
    'core:AdminPassword',
  ],

  // An authentication source which can authenticate against both SAML 2.0
  // and Shibboleth 1.3 IdPs.
  'application.example.org' => [
    'saml:SP',
    'entityID' => 'https://application.example.org',
    'idp' => 'https://idp.example.org',
  ],
];
Then we exchange the metadata with the IdP and we have a testable setup. You can use https://application.example.org/saml/module.php/core/authenticate.php to test the application as an authentication source. You should be able to login via your IdP
If so, writing a simple php program that needs authentication is peanuts:
<?php

require_once('/var/www/simplesamlphp/lib/_autoload.php');

$as = new \SimpleSAML\Auth\Simple('application.example.org');
$as->requireAuth();
$attr = $as->getAttributes();

print_r($attr);In earlier articles I described how to setup vhosts with https in OpenBSD’s httpd, but in the end I got stuck because httpd did not have the flexibility I need in my webserver, so the switch back to nginx was eminent. Now let’s get that dynamic vhosting running with fully automated certificate renewal from Let’s Encypt!
First we setup a server at port 80 that serves the acme-challenge and sends everything else to https:
server {
	listen 80 default_server;
	listen [::]:80 default_server;
	server_name _;

	# the acme-challenge
	location /.well-known/acme-challenge {
		rewrite ^/.well-known/acme-challenge/(.*) /$1 break;
		root /acme;
	}

	# redirect everybody else to https
	location / {
		return 301 https://$host$request_uri;

	}
}
Since OpenBSD’s nginx port does not allow the use of variables in the ssl_cerificate and ssl_certificate_key directives. I configured acme-client with only one certificate with a whole long list of alternative names. Kinda ugly, I know…
Activate this server and run:
$ doas acme-client -Fv example.comWhen you have your certificate you can add it to the server configuration:
server {
	listen 443 ssl default_server;
	listen [::]:443 ssl default_server;
        server_name $host;
	set $basepath "/vhosts";
	ssl_certificate     /etc/ssl/example.com.fullchain.crt;
	ssl_certificate_key /etc/ssl/private/example.com.key;

	if ($host ~ "^(.[^.]*)\.(.[^.]*)$") {
		set $rootpath "$1.$2/www/";
	}
	if ($host ~ "^(.[^.]*)\.(.[^.]*)\.(.[^.]*)$") {
	        set $rootpath "$2.$3/$1/";
	}

	root $basepath/$rootpath;

	location / {
		# First attempt to serve request as file, then
		# as directory, then fall back to displaying a 404.
		try_files $uri $uri/ =404;
	}

	include common.conf;
}
$ doas rcctl reload nginxAnd enjoy your dynamic vhosts with https. The only thing you need to do everytime you’ll add a (sub)domain is add it to /etc/acme-client.conf and renew your certificate.