I just updated a Ubuntu 20.04 LTS box to 22.04 LTS and found out my nginx server would not come up. The reason? It was not able to resolve it’s upstream servers by name. Known issue. So I started to google it. But DAMN! WTF! The internet is like a f*cking echo chamber for so-called techies writing blog posts all over the place and asking for coffees in return. It is really sad. Even the typo’s are just copy-pasted!
I wanted a solution that is NOT editing a file which states very clearly at the top:
# This is /run/systemd/resolve/stub-resolv.conf managed by man:systemd-resolved(8).
# Do not edit.
It took me quite some searching but I finally found it, the magic happens in /etc/systemd/resolved
DNS=8.8.8.8 8.8.4.4
Domains=remyblom.nl
(I used the google DNS in the example above, but I’d recomment using your local internet provider’s DNS at all time. Better for both performance and your privacy)
I once was quite ready with every major update of macOS ruining my apache setup. So I decided to install nginx. Besides, it is by far the better webserver of the two, so that is a win-win!
I recently lost a box due to unpaid invoices; all mail from my hosting partner ended up in my junk-folder, never saw them. So I had to get a new box and do a fresh install. Let’s write up the lessons learned while doing this.
Thanks to my previous posts everything was back in no time, but since my first steps in OpenBSD were a bit bumpy I decided to do a new write-up, first let’s install OpenBSD. The only problem I ran into was the fact that for some reason DHCP was not working so I had to manually configure the network.
After that I followed my previous hardening procedures. Learned about setting the clock on OpenBSD to fix a problem with pkg_add. To install some hard-needed utilities:
$ doas pkg_add nano git rsync
Next up: installing and configuring the OEMP stack. The acme-client seems to be part of base these days, nice!
$ doas pkg_add nginx mariadb-server php-mysqli
NGINX & Let’s Encrypt certificates
I have a nice git-repo with all kinds of useful stuff to configure nginx called etc-nginx. Not public (yet). I clone it into ~/git/etc-nginx.
Preparing the /etc/nginx directory for my default way of working:
$ cd /etc/nginx
$ doas ln -sf ~/git/etc-nginx/common
$ doas ln -sf ~/git/etc-nginx/nginx-openbsd.conf nginx.conf
$ doas mkdir cert
$ doas openssl dhparam -out /etc/nginx/cert/dhparam.pem 4096
$ doas mkdir sites-enabled
$ cd /etc/nginx/sites-enabled
$ doas ln -sf ~/git/etc-nginx/sites-available/acme-challenge.conf
$ doas nginx -t
$ doas rcctl start nginx
Configure acme-client to automate the renewal of the Let’s Encrypt certificates.
$ doas cp /etc/examples/acme-client.conf /etc/acme-client.conf
$ doas nano /etc/acme-client.conf
Change the domain example.com to your domain and add alternative names, change the location of the files to /etc/nginx/cert/.
domain example.com {
  alternative names { secure.example.com }
  domain key "/etc/nginx/cert/key"
  domain full chain certificate "/etc/nginx/cert/chain.crt"
  sign with letsencrypt
}
Let’s run the client: (double v for extra verbose)
$ doas acme-client -vv example.com
Add the dynamic vhosts configuration for single cert:
$ doas ln -sf ~/git/etc-nginx/sites-available/dynamic-vhosts-single-cert.conf
$ doas nginx -t
$ doas rcctl reload nginx
Browsing to any of the domains pointing to this box should now work. Now that we have nginx running https we can add the certificate renewal to crontab:
The packages are already installed so we only need to configure them.
$ doas /usr/local/bin/mysql_install_db
$ doas rcctl start mysqld
$ doas /usr/local/bin/mysql_secure_installation
$ doas ln -sf /etc/php-8.0.sample/mysqli.ini /etc/php-8.0/
Most times I just install a couple of php-modules because I will eventually end up using them anyway. Most notably php-curl. And as it turns out there is something you’ll need to do to make it work that caught me on one of my servers…
$ doas cp /etc/resolv.conf /var/www/etc/resolv.conf
Make sure everything is enabled and starts at reboot:
$ doas rcctl enable httpd
$ doas rcctl enable php80_fpm
$ doas rcctl enable mysqld
$ doas reboot
Verify
Most simple way to verify the whole stack is by installing phpmyadmin into: /var/www/html/phpmyadmin
$ cd /var/www/html
$ doas curl -o file.tar.gz https://files.phpmyadmin.net/phpMyAdmin/5.1.0/phpMyAdmin-5.1.0-english.tar.gz
$ doas tar -xzf file.tar.gz
$ doas ln -sf phpMyAdmin-5.1.0-english.tar.gz phpmyadmin
$ cd phpmyadmin
$ doas mkdir tmp
$ doas chmod 777 tmp
$ doas mv config.sample.inc.php config.inc.php
$ doas nano config.inc.php
Add a 32 char long random string for Blowfish and enter 127.0.0.1 for the first server instead of localhost. Follow any upcoming errors in phpmyadmin…
When I first installed MongoDB on my OpenBSD box I didn’t care about authentication, it was behind the firewall, purely for testing purposes. I first wanted to have some fun with it. But now I became curious and wanted to things right, so I enabled authentication.
In order to do so we first need to create an admin user:
Okay, for a new project I want to try and move to MongoDB, I am really looking forward to a schema free database where I can simply just store my ‘documents’ and do with them what I want!
So let’s log into our server and get some stuff installed:
$ doas pkg_add mongodb
$ doas rcctl enable mongod
$ doas rcctl start mongod
$ mongo
MongoDB shell version: 3.2.22
connecting to: test
Welcome to the MongoDB shell.
For interactive help, type "help".
For more comprehensive documentation, see
	http://docs.mongodb.org/
Questions? Try the support group
	http://groups.google.com/group/mongodb-user
Server has startup warnings:
2020-03-20T23:01:00.737+0100 I CONTROL  [initandlisten]
2020-03-20T23:01:00.737+0100 I CONTROL  [initandlisten] ** NOTE: your operating system version does not support the method that MongoDB
2020-03-20T23:01:00.737+0100 I CONTROL  [initandlisten] **       uses to detect impending page faults.
2020-03-20T23:01:00.737+0100 I CONTROL  [initandlisten] **       This may result in slower performance for certain use cases
2020-03-20T23:01:00.737+0100 I CONTROL  [initandlisten]
2020-03-20T23:01:00.737+0100 I CONTROL  [initandlisten] ** WARNING: soft rlimits too low. Number of files is 128, should be at least 1000
2020-03-20T23:01:00.737+0100 I CONTROL  [initandlisten]
For what it’s worth Mongo is showing some startup warnings, I’m going to ignore these for now. Let’s first insert some data so we can test our db connection later when we are in PHP:
Thing is we have a working MongoDB, kinda cool, but I want to be able to talk to it from PHP (or do I? I might have to rethink that… PHP is waaaay old and stuff?)
First we have to prepare our OpenBSD to be able to run the manual installation. (I still think this should also be able to work in such a way that you could just use the pecl install method, but I kept running into the error mentioning AUTOCONF_VERSION was not set…)
In order to get phpize running I had to do:
$ doas pkg_add pear autoconf
$ cd /usr/local/bin
$ ln -s phpize-7.3 phpize
$ ln -s php-config-7.3 php-config
Furthermore I had to add to my ./profile:
export AUTOCONF_VERSION=2.69
Then I had to re-login for the profile to take effect and then I could run:
$ git clone https://github.com/mongodb/mongo-php-driver.git
$ cd mongo-php-driver
$ git submodule update --init
$ phpize
$ ./configure
$ make all
$ sudo make install
Restart php-fpm and ready to go:
$ doas rcctl restart php73_fpm
Let’s write a little program that returns that user we inserted in the beginning:
<?php

    $m = new MongoDB\Driver\Manager("mongodb://localhost:27017");
    $query = new MongoDB\Driver\Query([]);

    $results = $m->executeQuery("testdb.users", $query);
    echo $results;

    foreach ($results as $result) {
        print_r($result);
    }
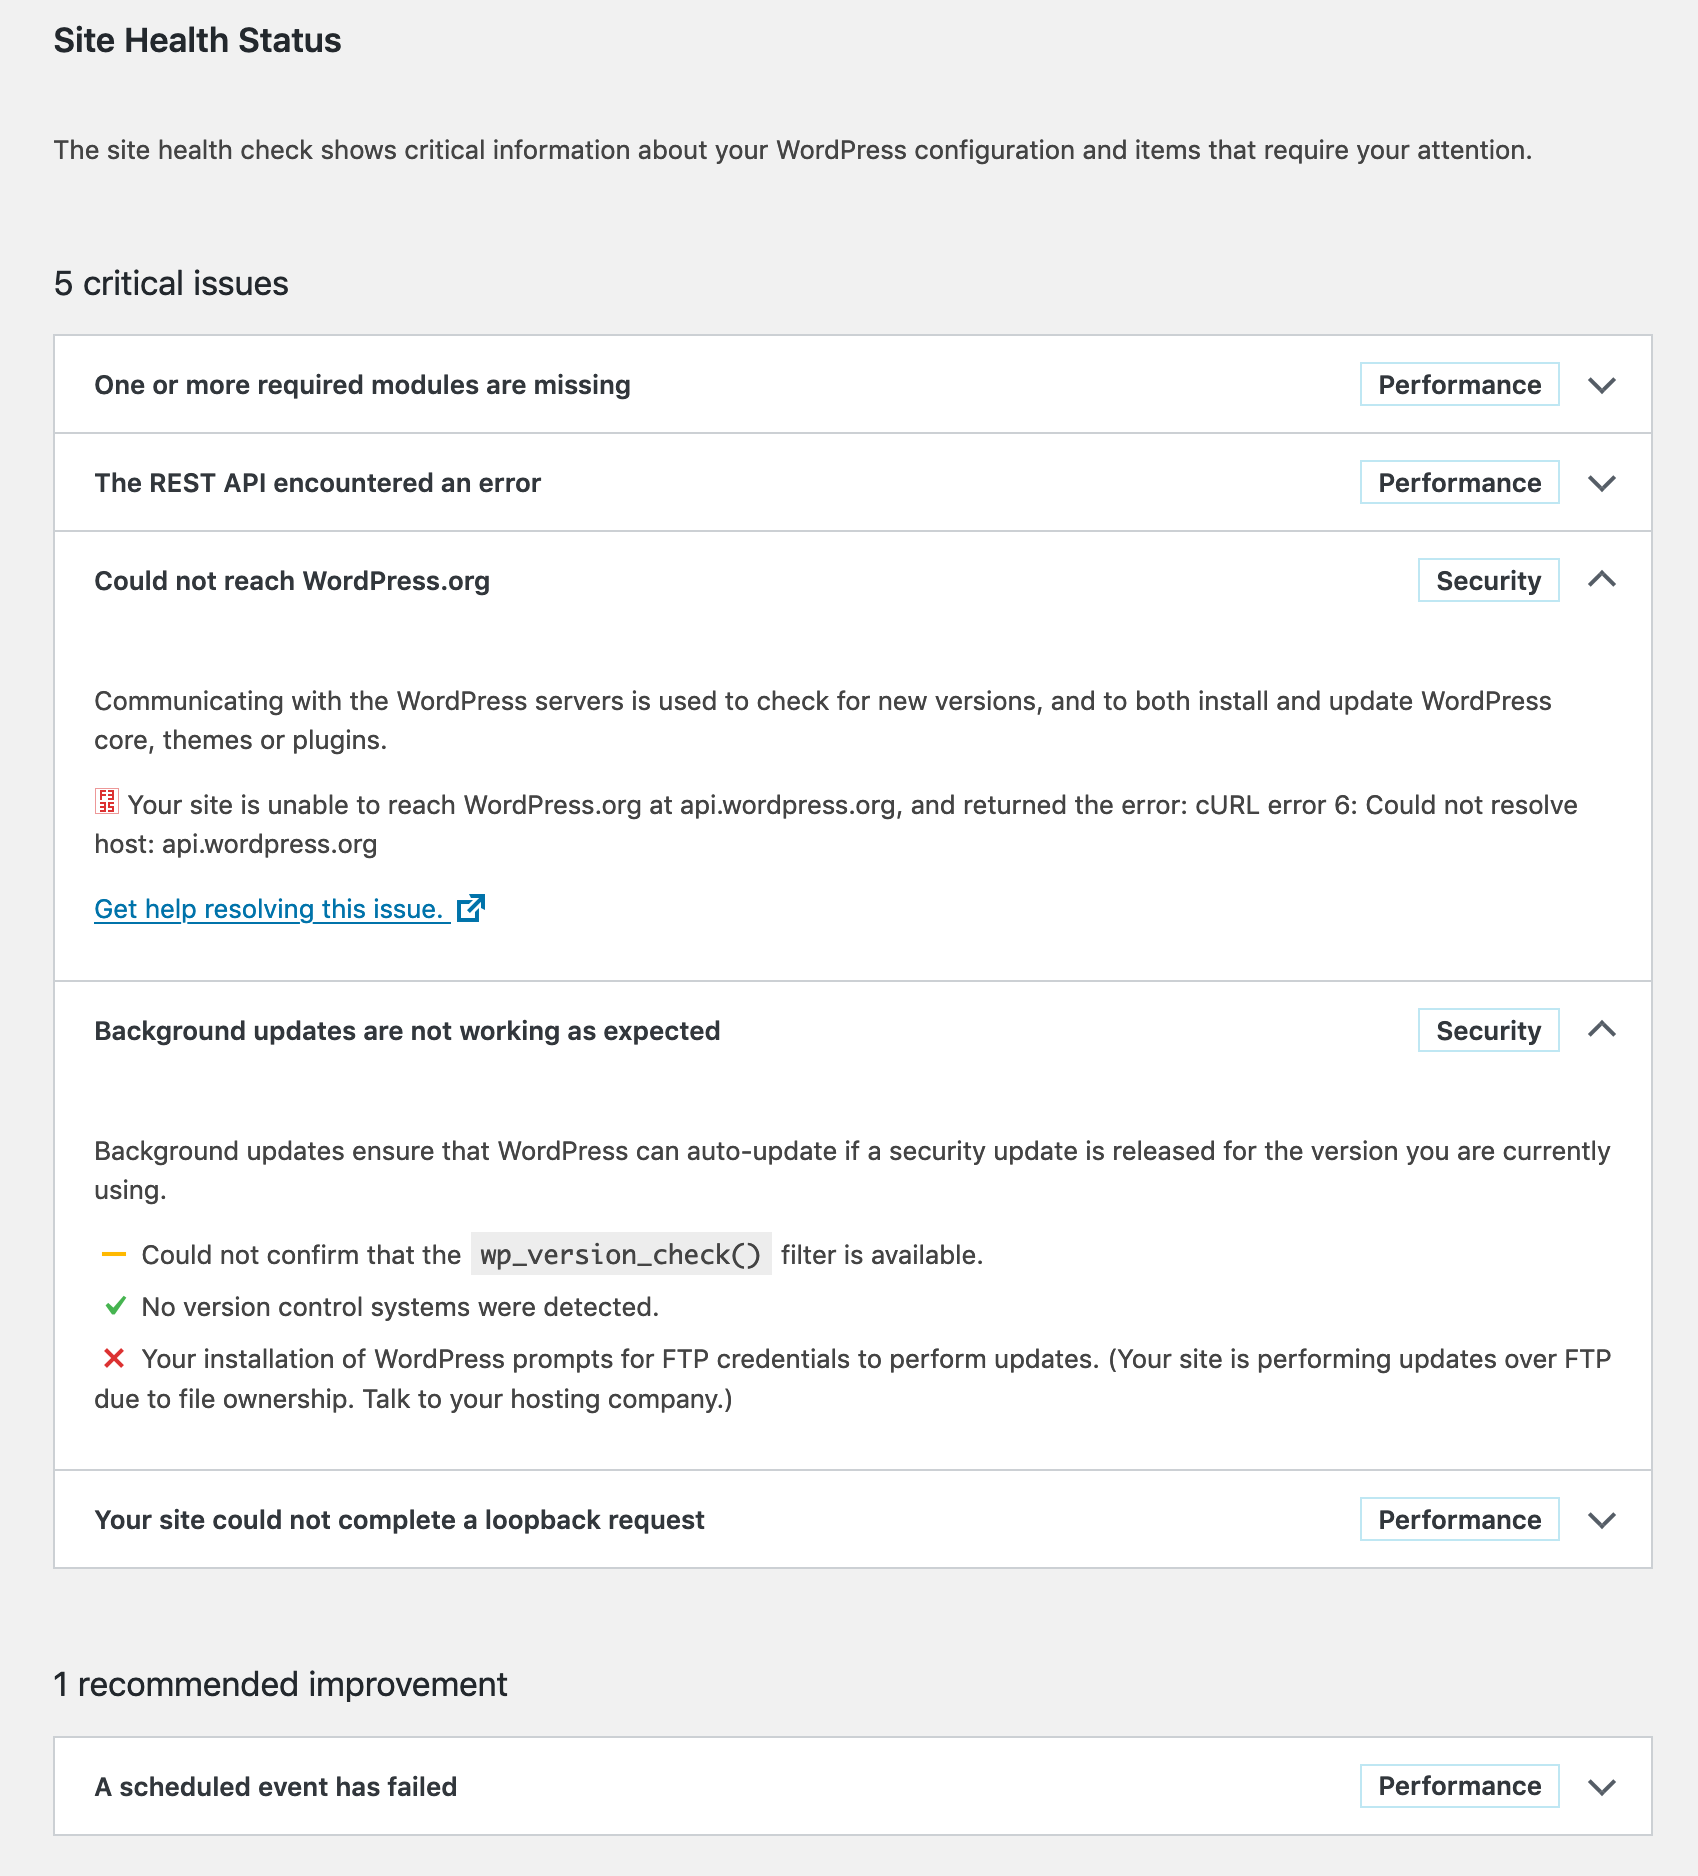
I recenlty moved my WordPress installation to another server; the one it was on was acting slow most of the time, which annoyed me in some cases. But now on the new server I get this bitching screen again when I run Tools > Site Health.
I want a healthy site!
One or more required modules are missing
The only required module seams to be gd, so I install it, and the optional zip. I don’t like imagick so I skip that.
$ doas pkg_add php-zip php-gd wget
$ doas mv /etc/php-7.3.sample/* /etc/php-7.3/
$ doas rcctl restart php73_fpm
The REST API encounted an error/Could not reach WordPress.org/Your site could not complete a loopback request
These three problems all have the same error message:
Error: [] cURL error 6: Could not resolve host: [some domain]
Looks like someone has trouble with dns resolving… Now the weirdest thing is that on my previous server, this was all working just superfine, but on the current server I just don’t get this error out of the way. Google (or any other search-engine) is not of any help. People fixing things with putting stuff in /etc/hosts, or putting the Google DNS servers in /etc/resolv.conf are not fixing problems, just mere circumventing them.
I have done quite some research in this issue and as it turns out any php run thru my webserver is not able to resolve any hosts, functions like gethostbyname or dns_get_record return nothing on this new server (and work like a charm on my old one…. GRRRR!!!)
Also interesting to know is that the functions above work perfectly fine when I run the php-scripts from the command-line:
This one is easy to solve, just make sure that the files of WordPress are of the right owner:
$ cd /var/www/vhosts/remyblom.nl/blog
$ doas chown -R www:www .
Temporary Conclusion
The problem with cURL seems pretty consistent, although my two servers and their installations are so very equal, it’s super-scary. But I will continue the search, other pointers might be:
Firewall settings?
completely reinstall, php-fpm, php-curl, openBSD?
FINALLLLLY!!!! YES!!!!!
Man I have been looking into this issue so many times and now, May 2021, installing a new box with OpenBSD, I finally managed to enter the right search-query and FIND THE ANSWER!
$ cd /var/www/
$ doas mkdir etc
$ cd etc
$ doas cp /etc/resolv.conf .
I also came across this question googling for apache2 dynamic vhost fallback and Luc’s answer helped me a lot with solving my problem, but I still want to show what I did to achieve my goals, mainly because it involved some extra works and because I think it could be helpful for any future googlers…
My goals
dynamic vhosting for all domains and subdomains pointing at my VPS
foo.com should serve the same content as www.foo.com
fallback for unknown domains to some sort of default
fallback for unknown subdomains of foo.com to www.foo.com unless the www is not available, fallback to default instead
DNS
I have a couple of domains (and all their subdomains) pointing at my VPS, for example:
foo.com
bar.com
foobar.com
Filesystem
I have the following directories, domains contain directories with the names of the available subdomains, the www directory is required, but the config should be able to deal with the situation where it is not present. Localhost is used as default fallback:
How does this work? There are three virtual hosts defined:
localhost
The localhost serves as a default. All requests that are not resolvable are served by localhost. Setting up a symlink from localhost to any of your domains is like setting up that site as a default.
sub.domain
The sub.domain vhost is taking all requests in the form of *.*.*. By default all requests are served from /domain.com/sub as defined by VirtualDocumentRoot /var/www/%-2.0.%-1.0/%-3.
fallback:
The first RewriteRule takes care of unknown domains, eg. domain.com directory does not exist, by proxying the localhost website.
The second RewriteRule also proxies to localhost when both the domain.com/sub and the domain.com/www directories are not present.
The third RewriteRule proxies to domain.com when domain.com/sub does not exist. We know domain.com/www does exist because of the second rewrite block.
bare.domain
The bare.domain vhost is taking the *.*requests and serves them /domain.com/www
Here the RewriteRule will proxy to localhost when domain.com or domain.com/www do not exist.
^$%.*!!!
I had some trouble wrapping my head around all those $ and % signs in the RewriteCond and RewriteRule so I will explain about them here:
The %n in the second RewriteCond refer to the selections (.*) from the first RewriteCond, eg. the parts of the requested domain.
The %n in the RewriteRule do too.
The $1 in the RewriteRule refers to the selection (.*) at the beginning of the RewriteRule. Which captures everything from the domain till the ? in the request url. Any querystring is automatically added to the url by mod_proxy.
On a server with nginx already setup, I wanted to write a php-application that needed SAML-authentication. So let’s install SimpleSAMLphp and configure it and nginx to have the magic going. I presume you have a user with sudo privileges that is also member of the www-data group.
Now that we have a simpleSAMLphp installation let’s configure it, edit config/config.php
// I like short baseurlpaths:
'baseurlpath' => 'https://application.example.org/saml/',

// I always fill in the technical contact information:
'technicalcontact_name' => 'Remy Blom',
'technicalcontact_email' => 'na@example.org',

'timezone' => 'Europe/Amsterdam',

// https://passwordsgenerator.net/
// length = 32, include numbers and lowercase characters
'secretsalt' => 'ner9iuf8vu3fqkgawqchu7bcp4ihn221',

// you might want to change this one:
'auth.adminpassword' => '123',

'admin.protectindexpage' => true,
Now let’s setup nginx to serve simpleSAMLphp from the /saml url: in /var/www/html/ I create a symlink:
<?php

$config = [
  // This is a authentication source which handles admin authentication.
  'admin' => [
    // The default is to use core:AdminPassword, but it can be replaced with
    // any authentication source.
    'core:AdminPassword',
  ],

  // An authentication source which can authenticate against both SAML 2.0
  // and Shibboleth 1.3 IdPs.
  'application.example.org' => [
    'saml:SP',
    'entityID' => 'https://application.example.org',
    'idp' => 'https://idp.example.org',
  ],
];
Then we exchange the metadata with the IdP and we have a testable setup. You can use https://application.example.org/saml/module.php/core/authenticate.php to test the application as an authentication source. You should be able to login via your IdP
If so, writing a simple php program that needs authentication is peanuts: